Neutral Tile Cleaner

Neglected Victorian Tiled Floor Restoration in Kensington

Deep Clean and Restoration of a Victorian Tiled Hallway Floor in Kensington

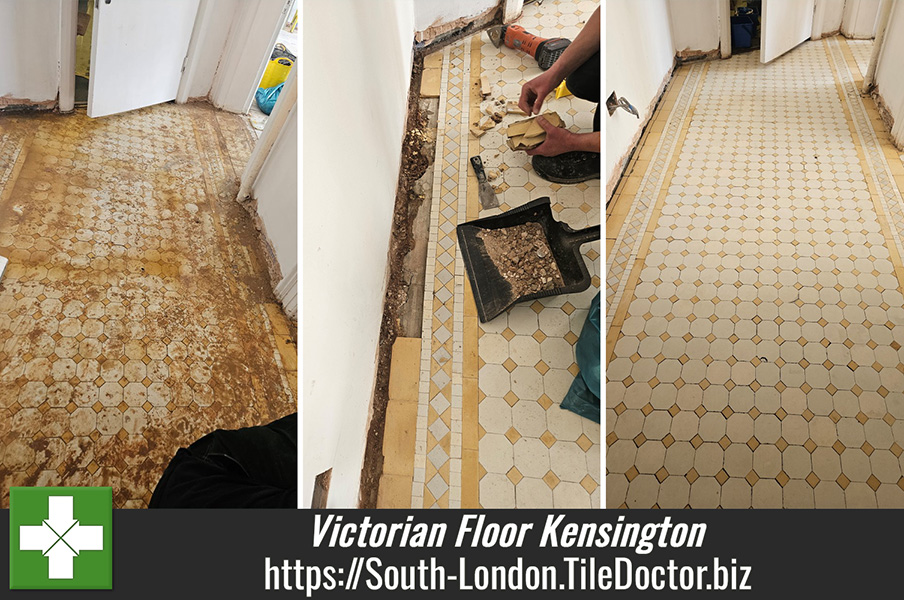
The photographs below are of a Victorian tiled floor at a property across the Thames in Kensington which as you can see was in quite a poor state, especially along the edges. The property was being renovated and the walls recently plastered following a rewire resulting in all sorts of building materials being trod into the tiles leaving them looking very neglected.

Neglected Victorian Tiled Floor Before Restoration Kensington Neglected Victorian Tiled Floor Before Restoration Kensington

The biggest problem were the border tiles where many had become damaged and cracked over the years. It would be a straight-forward task to replace them however, and I was confident of finding matching replacements.

Neglected Victorian Tiled Floor Before Restoration Kensington Neglected Victorian Tiled Floor Before Restoration Kensington

I worked out a quote for the work which would include replacing the damaged tiles, deep cleaning the floor and then sealing to protect it. The quote included sourcing replacement reproduction tiles for which there are several suppliers, and I was confident that after a clean and seal the new tiles would blend in well with the original.

Cleaning and Restoring a Victorian Tiled Hallway

The room was completely empty due to the house being renovated so I was able to crack straight on starting by giving the floor an initial clean using Tile Doctor Oxy-Gel. Normally I would do the repairs first but with the floor being so dirty I wanted to be sure I could see all the tiles that needed replacing.

Old Victorian floors don’t have the benefit of a damp proof membrane so it’s important to keep the use of water to a minimum and avoid the appearance of white efflorescent salts which can rise through the tile as it dries. The gel was applied neat to the Victorian tiles and allowed to soak in for about ten minutes before being worked in using a 200-Grit pad fitted to a rotary buffer. The combination of the coarse pad and the cleaning gel does a good job of bringing the dirt to the surface where it was then removed with a wet vacuum.

Neglected Victorian Tiled Floor During Repairs Kensington Neglected Victorian Tiled Floor During Repairs Kensington

With the floor clean I set about removing the broken tiles which was done carefully to avoid disturbing more tiles than necessary. The rubble was removed, and the foundation was rebuilt with self-levelling compound to the correct level. Once that had set, the replacement tiles were shaped and secured in place with fresh adhesive and grout. When complete I left for the day to allow the repairs to set overnight.

The following day I completed the cleaning process using another gel product called Tile Doctor Acid Gel. The acidic nature of the product also neutralises any salts that may be present and then leaves a microscopic etch on the clay tiles which helps to achieve a better bond with the sealer. The gel was then rinsed off and extracted as before and the floor left to dry off overnight.

Sealing a Victorian Tiled Hallway

The next day we started sealing the floor with Tile Doctor Colour Grow. This is a fully breathable sealer which is an important feature when sealing old floors like this, it also contains a colour enhancer. The sealer protects the tiles from ingrained dirt ensuring it remains on the surface where it can be easily cleaned away.

Neglected Victorian Tiled Floor After Restoration Kensington Neglected Victorian Tiled Floor After Restoration Kensington

Once complete the floor was completely transformed and unrecognisable from before, hopefully the decorators who will be working on the property next will ensure it stays that way. For aftercare cleaning I recommended using Tile Doctor Neutral Tile Cleaner which is a mild yet effective tile cleaner that’s designed for use on sealed floors.

Neglected Victorian Tiled Floor After Restoration Kensington


Professional Restoration of a Victorian Tiled Hallway in London

Deep Clean and Restoration of a Victorian Tiled Hallway Floor in Kensington Read More »

Bleached Slate Tiled Courtyard Restored Roehampton

Restoring the Appearance of Black Slate Tiled Courtyard in Roehampton

Here we have a Slate tiled courtyard at a property in Roehampton SW15 that had been installed 20 years prior and clearly not received much love since. The main issue was the grouting which was cracked in places and water had been leaking into the basement below. I suspect the Slate had been previously cleaned with a strong acidic patio cleaner as the stone had lost all its colour and looked bleached.

Slate Tiled Courtyard Before Cleaning Roehampton Slate Tiled Courtyard Before Cleaning Roehampton

The owner contacted me to see what could be done and once it was clear these were originally black slate tiles, I knew exactly what to do to restore the colour and put the life back into the floor. I discussed the restoration process with the owner and worked out a quote for the work. Happy to have finally found a solution I was given the go ahead and a date set for the work to start.

Slate Tiled Courtyard Before Cleaning Roehampton Slate Tiled Courtyard Before Cleaning Roehampton

Cleaning and Repairing a Slate Tiled Courtyard

I started by removing the cracked and failing grouting and replaced it with a modern epoxy jointing compound normally sold for paving. There were a lot of grout lines to cover so it took some time to complete. The floor was then left to set before moving onto the next stage of cleaning.

To clean the Slate tiling I applied a strong dilution of Tile Doctor Pro-Clean and left it to soak in for ten minutes before scrubbing it in with a carbide brush fitted to a rotary machine. The dirt released from the tiles was then rinsed away and extracted with a wet vacuum. The floor was then inspected and the process repeated where needed until I was happy the Slate was as clean as it could be.

Sealing a Slate Tiled Courtyard

The floor was then left to dry off again and I returned later to seal the tiles when the weather was dry. I used Tile Doctor X-Tra Seal for this, in fact it was a perfect choice as its suitable for external use and is an oil-based sealer which is exactly what the slate needed to restore the black colour to the stone.

Slate Tiled Courtyard After Renovation Roehampton Slate Tiled Courtyard After Renovation Roehampton

For aftercare I advised the use of Tile Doctor Neutral Tile Cleaner which is a mild but effective tile and grout cleaner that won’t impact the sealer. The floor looked great, and my client was very happy with the completed project.


Professional Restoration of a Slate Tiled Courtyard in South London

Restoring the Appearance of Black Slate Tiled Courtyard in Roehampton Read More »

Terracotta Tiled Kitchen Floor Renovation Balham

Dirty Terracotta Tiled Kitchen Floor Renovated in Balham SW12

The photographs below show the condition of a heavily soiled Terracotta tiled kitchen floor at a residential property in Balham, SW12, which I was recently commissioned to renovate. The client had several outstanding tasks related to the renovation of the property, but the kitchen floor was the most urgent due to its significant level of soiling. The client described the condition of the floor as “VERY dirty” and in immediate need of professional attention.

During an initial site visit, I conducted a thorough inspection of the floor. It became clear that the contamination was largely the result of recent renovation work carried out by other tradespeople. A cleaning test confirmed that the floor would respond positively to deep cleaning. I also identified that a sealer had previously been applied, but to restore the floor to a satisfactory standard, a deep and intensive cleaning process would be necessary, followed by resealing.

Terracotta Tiled Kitchen Floor Before Renovation Balham Terracotta Tiled Kitchen Floor Before Renovation Balham

Following this assessment, I prepared a detailed quotation for the renovation work, which was approved by the client. A suitable date was then agreed for the commencement of the job.

Deep Cleaning a Terracotta Tiled Kitchen Floor

Upon returning to the property, I began the renovation by carrying out a deep cleaning of the Terracotta tiles and grout lines. For this, I used a strong dilution of Tile Doctor Remove and Go, combined with Nanotech HBU to maximise effectiveness. The solution was agitated into the surface using a rotary floor machine fitted with a coarse carbide brush.

Terracotta Tiled Kitchen Floor During Renovation Balham

The floor was then rinsed thoroughly, and the resulting slurry extracted using a wet vacuum. I carefully inspected the tiles and grout after the first pass, and any areas with persistent staining were retreated using the same method. To ensure a thorough clean of the grout lines, I applied a strong solution of Tile Doctor Pro-Clean, which I worked in manually using a hand-held scrubbing brush until the grout reached an acceptable standard.

Terracotta Tiled Kitchen Floor During Renovation Balham

The floor was rinsed multiple times throughout the cleaning process, with each rinse followed by slurry extraction using the wet vacuum. After the final rinse, I used the vacuum once more to remove as much residual moisture as possible.

Sealing a Terracotta Tiled Kitchen

Before sealing, I tested the floor with a damp meter to ensure it was completely dry. Once confirmed, I applied several coats of Tile Doctor Colour Grow. This sealer contains a colour-enhancing formula that accentuates the natural orange and red tones typical of Terracotta.

Terracotta Tiled Kitchen Floor During Sealing Balham

Tile Doctor Colour Grow is an impregnating sealer that penetrates the surface of the tile, filling the pores to prevent the ingress of dirt and moisture. This ensures easier maintenance and provides long-term protection, while preserving the natural matte appearance of the tiles — an important requirement expressed by the client.

The transformation was remarkable. The client was extremely satisfied with the result, stating that the floor now “looks like new.”

Terracotta Tiled Kitchen Floor After Renovation Balham Terracotta Tiled Kitchen Floor After Renovation Balham

For ongoing maintenance, I recommended the use of Tile Doctor Neutral Tile Cleaner. This pH-neutral product is specially formulated to clean sealed tiles without degrading the protective sealer. I advised against using standard household cleaning agents, as many are too aggressive and can compromise the integrity of the sealer over time.


Professional Restoration of a Terracotta Tiled Kitchen Floor in South London

Dirty Terracotta Tiled Kitchen Floor Renovated in Balham SW12 Read More »

Bathroom Floor Grout Restoration in Tooting SW17

Bathroom Floor Tile Grout Restoration in Tooting SW17

A client was renovating a house in Tooting and wanted to see what could be done to improve the Ceramic floor tiles in the bathroom without the expense of a major overhaul. Having discussed the floor over the phone I was confident it could be improved and agreed a date to come over and survey the tiles and provided a quote for their renovation.

Bathroom Floor Grout Before Restoration in Tooting SW17

Except for one cracked tile, the tiles were in good condition and I could see it was really the grout that was bringing the bathroom down. The grout was generally discoloured and some had cracked and become loose. This cracking issue is indicative of using an inflexible grout when tiling on a wooden floor as these floors tend to have a bit of movement in them.

I discussed my renovation plan with the customer and provided a quote for carrying out the work which was accepted.

Renovating Bathroom Floor Grout

On the first day I set about raking out the cracked grout and stripping out the silicone between the tile and the bath. Silicone seems to attract mould and although it can be cleaned to some extent, I usually find its more effective to simply replace it. I then tidied up the bathroom to remove the waste grout and silicone, so the area was ready for grouting. I used a flexible White grout for this in order to match the original, although most of that was no longer White due to the staining.

I left the grout to set overnight and returned the next day to complete the job starting with the re-application of the silicone sealant, again in White but this time using an anti-mould variety. My attention then turned to the floor tile grouting which of course was now a mixture of fresh new grout and stained grout. I had realised this would be the result, so I had come prepared and was ready to apply Tile Doctor Grout Colourant in white to make everything uniform.

Before applying the colourant, I prepped the grout joint with Tile Doctor Pre-treat cleaner that is an acidic cleaning solution that is sprayed onto the grout and then scrubbed in. This cleans the grout joints, and the acidic nature of the cleaner helps prepare the grout to achieve a better bond with the colourant. The grout was then wiped with a wet sponge to remove the dirt and then dried ready for the colourant. Although the cleaner had helped to clean the grout and remove surface dirt it can’t do anything about deep seated staining, so colouring was still necessary.

Once the grout was dry the White grout colourant was painted onto the grout using a small brush wiping off any excess from the tile as I went. The Tile Doctor range of Grout Colourants come in eleven different colours and form an epoxy barrier over the grout preventing dirt from reaching the grout line and making it much easier to keep clean.

Bathroom Floor Grout After Restoration in Tooting SW17

Once the colourant had dried, I gave the floor a quick clean with Tile Doctor Neutral Tile Cleaner to get the ceramic tiles clean and the job was complete. The refreshed grout now has a consistent white appearance, and it really lifted the appearance of the bathroom.


Professional Restoration of a Bathroom Floor Grout in South London

Bathroom Floor Tile Grout Restoration in Tooting SW17 Read More »

Porcelain Tile Bathroom Grout Cleaning Wandsworth

Porcelain Tiled Bathroom Grout Renovation in Wandsworth

This is a great example of how easy it is to improve the appearance of a tiled bathroom. In this case the property was in Wandsworth and the tiles were Porcelain. My client had originally asked if I could re-grout their bathroom tiles which included the shower, wall and floor tiles in a room that was around 5sqm.

Porcelain Bathroom Tile Before Grout Renovation Wandsworth

We discussed the bathroom, and I pointed out that if we re-grout the tiles it would only get grubby again at some point. The problem is that the grout is cementitious which leaves it rough and attracts dirt easily. I recommended cleaning up the grout and then applying a grout colourant which would seal the grout in making it much easier to clean. I also offered to remove the silicone sealant between the edges of the bath and tiles. Unfortunately, once mould gets into the silicone, you’re fighting a losing battle, and it is best to just replace it.

Re grouting a Porcelain Tiled Bathroom Floor

Before colouring the grout, it needs to be prepared with an acidic cleaner that will not only remove any dirt but also etch the surface of the grout to improve the bond. Tile Doctor Pre-Treat Cleaner is the product we use for this purpose, but I decided in this case to go with a different product as the floor tiles had some old silicone on them which had been left to dry out. To resolve this, I used a different product in the range called Tile Doctor Grout Clean-Up which is primarily designed for removing grout haze.

Porcelain Bathroom Tile During Grout Renovation Wandsworth

It was only a small area, so I worked the Tile Doctor Grout Clean-Up into the tiles and grout by hand and then rinsed it off with water and extracted with a wet vacuum. The grout was then dried, and I started applying the Tile Doctor Grout Colourant in white with a small brush wiping off the excess as I went. The colourant is available in a range of eleven colours so there is usually a match for most situations. The colourant adds an epoxy barrier over the grout; this then prevents dirt from going into the grout line and means the floor is much easier to keep clean.

The last step in the renovation involved carefully stripping out the old silicone and replacing it with a new anti-mould variety. This last step really finished off the bathroom giving the impression it was a new installation.

My clients were very happy with the result, the bathroom was transformed, and they were relieved that the problem was solved so easily.

Porcelain Bathroom Tile After Grout Renovation Wandsworth

For aftercare cleaning I recommended regular use of Tile Doctor Neutral Tile Cleaner which is a mild yet effective tile and grout cleaning product that would help keep the bathroom looking good going forward.


Professional Restoration of a Porcelain Tiled Bathroom Grout in South London

Porcelain Tiled Bathroom Grout Renovation in Wandsworth Read More »

Black Slate Kitchen Floor Renovation Tooting

Black Slate Tiled Kitchen Floor Renovated in Tooting

The photos below are of a Black Slate Kitchen floor at a property in Tooting SW17, which as you can see had lost all its colour and character. I went over to survey the floor and discussed a renovation plan with the owner.

One of the problems was the grout which like the tile hadn’t faired very well over the years and being in the Kitchen was subject to staining. I explained that like all stone floors the Slate needed to be sealed in order to keep the dirt out of its pores and keep it looking its best. Sealers however wear down with use and in this case the floor hadn’t been deep cleaned and sealed for some time.

I costed out a renovation plan which included deep cleaning the Slate tile removing any remaining sealer in the process, renovating the grout, and then re-sealing the whole floor to bring back the appearance of the stone and protect it going forward. Happy with the quote we agreed a date to start the work.

Deep Cleaning a Natural Black Slate Tiled Kitchen Floor

Normally I would use a Tile Doctor product called Remove and Go to remove the sealer, however in this case testing had shown that what was left of the sealer could be removed with Pro-Clean which is also our go to Tile and Grout Cleaner.

I used a strong dilution of Pro-Clean to do this, spraying it onto the floor and leaving it to soak in for ten minutes and break down the dirt etc. Then using a black scrubbing pad fitted to a heavy rotary buffer machine it was worked into the Slate to release the dirt and old sealer. The floor was then rinsed with water and the soiling extracted with a wet vacuum.

The pads can struggle to get into the corners and edges of the floor and the recesses of the grout line. So, to complete the cleaning a handheld scrubbing brush was used and a wire brush run along the grout lines, again with more Tile Doctor Pro-Clean. After another rinse and extraction with the wet vacuum the floor was left to dry aided with a couple of floor blowers.

Grout Colouring and Sealing Black Slate Tiled Kitchen Floor

Once dry the grout was coloured with a Black Tile Doctor grout colourant which is basically painted onto the grout with a small brush and any excess wiped off the tile. This grout colourant gives the grout a uniform appearance and adds an impenetrable barrier over the grout sealing it in and keeping it safe from further staining. Keeping grout clean in a kitchen is always a problem so the colourant will protect it and make it very easy to clean.

Black Slate During Cleaning Grout Colouring Tooting

The last step was to seal the Slate for which I used Tile Doctor X-Tra Seal. This was chosen because it’s an impregnating oil-based sealer that will restore the beautiful dark colour in the stone. Impregnators work by occupying the tiny pores in the stone thereby forcing dirt to remain on the surface where they can easily be cleaned away.

Black Slate During Sealing Tooting

In the subject of maintenance cleaning, I recommend the use of Tile Doctor Neutral Tile Cleaner which is a gentle but effective cleaner that won’t harm the sealer. Many of the floor cleaning products you find in supermarkets etc are not for use on sealed stone, they contain strong chemicals such as bleach etc which will strip off the sealer prematurely so best avoided.

Black Slate After Renovation Tooting


Professional Renovation of Black Slate Tiled Kitchen Floor in South London

Black Slate Tiled Kitchen Floor Renovated in Tooting Read More »

Small Quarry Tiled Kitchen Floor Renovation Purley

30-Year-Old Laminate Floor Removed to Reveal Heavily Stained Quarry Tiles

The photos below are of a Quarry tiled floor situated in a small kitchen at a house in Purley. The quarry tiles were previously covered in laminate for about 30 years which had recently been removed. This left the floor in quite a state as you can see from the photograph below. The floor was stained with numerous deposits including paint and adhesive and some sort of wax covering which was all over the surface.

Small Quarry Tiled Kitchen Floor Before Renovation Purley

Cleaning a Quarry Tiled Kitchen Floor

Before cleaning I covered the entire kitchen in a drop cloth to protect the units from splashing, I normally remove the kick boards as part of this process however, in this case the bottom of the units were already siliconed to the tiles. This is good practice as otherwise the boards which are usually made of MDF can soak up the water used during cleaning and warp the boards.

Next, I tackled the staining, surface paint, adhesive and wax using a strong dilution of Tile Doctor Remove & Go combined with Tile Doctor Pro-Clean to make a double strength stripper and cleaner. This was applied to the tiles and grout, and then left to soak in for ten minutes. I used a floor scraper to dislodge the glue which had been softened by the solution and then removed using a wet vacuum. The next step was to scrub the floor with a carbide brush and a coarse 200-grit diamond pad using only water to lubricate the process.

Once this was done, I rinsed the floor with water and extracted the slurry with the wet vacuum and allowed it to dry.

Sealing a Quarry Tiled Kitchen Floor

Once the floor was dry, I returned to protect the tiles by applying Tile Doctor Colour Grow sealer. This is an impregnating sealer that works by soaking into the pores of the quarry tiles occupying the spaces within and thereby preventing dirt from becoming ingrained and making it much easier to clean. Tile Doctor Colour Grow also contains a colour enhancer that works well on Quarry tiles as it brings out the red colours in the tiles. Two coats of the sealer were applied allowing thirty minutes between coats.

I recommended the use of Tile Doctor Neutral Tile Cleaner for ongoing maintenance. This is a pH neutral product which is mild enough to use every day, gentle on the floor and will ensure the newly applied sealer will stay in place and the floor will continue to look great.

Small Quarry Tiled Kitchen Floor After Renovation Purley

The result was transformational, and it certainly impressed my customer who left the following 5 star feedback.

“Daniel and his team were amazing! Extremely professional, thorough, and undeniably delivered an excellent end result for my old and tired tiles. So impressed! I would most certainly use this service again. By Sarah, Purley, 12 June 2023”


Professional Renovation of a Quarry Tiled Kitchen in South London

30-Year-Old Laminate Floor Removed to Reveal Heavily Stained Quarry Tiles Read More »

Natural Black Slate Bathroom Floor Tile Renovation Brixton

Black Slate Tiled Bathroom Floor Transformed in Brixton

This bathroom floor at a property in Brixton was laid with natural Black Slate tiles around five years ago and then badly restored/cleaned three years ago. Some of the more noticeable problems included a build-up of limescale on top of old patchy grout paint and the sealant on the slate was failing allowing the tiles to absorb dirt. The result was a a very unappealing and grubby looking floor.

Natural Black Slate Bathroom Floor Tiles Before Cleaning Brixton

Unhappy with what could be a stunning Black Slate floor the owner contacted Tile Doctor and I was asked to visit the property, survey the tiles, and provide a quote for its renovation.

Cleaning a Natural Black Slate Tiled Bathroom Floor

To get the grout clean of dirt it was scrubbed with a stiff brush and a strong dilution of Tile Doctor Pro-Clean. The grout was then spot treated with Tile Doctor Grout Clean-Up to help remove the old grout paint and a ready mixed grout used to fill gaps where the grout had become dislodged.

Next, I addressed the slate tiles and applied Tile Doctor Remove and Go to remove what was left of the old sealer, the solution was left on the tiles for ten minutes and then agitated with a brush to dislodge the old sealer and dirt. The floor was then rinsed with water and the soil extracted with a wet vacuum.

Once done I could see more work was needed so a 200 grit 6-inch pad was fitted to a hand-held buffer and run over the tiles to further clean up the tiles along with a carbide brush to help reduce the lippage between the tiles. Once done the floor was rinsed and extracted again with water multiple times to ensure no trace of products was left on the Slate.

Sealing a Natural Black Slate Tiled Bathroom Floor

The floor was left for a few hours so it could dry and when dry sealed with two coats of Tile Doctor Colour Grow applied with a paint pad and cloth to add protection and to make the dark shades in the stone stand out.

To complete the look a Tile Doctor Black Grout Colourant was then applied to the grout lines so it would match the dark Slate better. The colourant has the added advantage of sealing in the grout and making it much easier to keep clean.

Natural Black Slate Bathroom Floor Tiles After Renovation Brixton

My client was very pleased with the transformation and left the following feedback for me which is always appreciated:

“Really excellent job from Daniel & team. My natural slate bathroom floor looks better than when it was first laid. Superb communication and finished job. I can’t recommend them enough. 5*”

The client has since asked us to come back to complete more works on the Limestone bathroom walls which of course we are happy to oblige!

For aftercare I recommended the use of Tile Doctor Neutral Tile Cleaner for the regular cleaning of tiles. This pH neutral product will keep the limescale at bay and eliminates the build-up of soap, it is mild enough to use every day and has a nice fresh smell.


Professional Renovation of Black Slate Tiled Bathroom Floor in South London

Black Slate Tiled Bathroom Floor Transformed in Brixton Read More »

Victorian Tiled Hallway Floor Renovated Fulham

Restoration of an Unloved Victorian Tiled Hallway Floor in Fulham

I received a request to quote for the restoration of this Victorian tiled floor in the hallway of a property in Fulham which as you can see from the photographs was in a very poor condition.

Victorian Tiled Hallway Before Cleaning Fulham

I visited the property to survey the floor and could see that except for a few loose tiles it was in good physical condition. From experience I knew it would respond well to a deep clean and seal so I carried out a test clean on a small area to demonstrate its potential. The tiles came up well and my client was satisfied it would be worthwhile to have it restored.

Victorian Tiled Hallway Before Cleaning Fulham Victorian Tiled Hallway Before Cleaning Fulham

When you have period features such as this floor in a property it is a shame not to make the most of them, they are sought after and will increase its value. Having agreed my quote, we arranged to carry out the work the following week.

Cleaning a Victorian Tiled Hallway Floor

To get all the dirt out of the pores of the tiles I first applied a strong dilution of Tile Doctor Remove and Go and after leaving it to soak in for ten minutes was scrubbed in with a black pad. I also used a steam cleaner during this process to help lift the dirt out of the pores. From what I could tell the tiles had a variety of contaminants including paint, plaster, cement, and dirt. Luckily Tile Doctor Remove and Go can handle all of these. I had to repeat the process on the stubborn stains and then removed all the slurry and dirt using a wet vacuum.

I then moved onto the loose tiles which needed to have the old adhesive removed from the tile and the base. The original tiles were then cleaned up by hand before new rapid setting adhesive was applied to secure them back into the floor.

Once the loose tiles had set, I moved onto the next step of giving the floor an Acid Rinse using Tile Doctor Acid Gel. This cleans up the tiles further by removing old grout smears and dissolving efflorescent salts in the floor. This is a common in properties of this age which don’t have a damp proof membrane to stop moisture rising through the tile. This process also neutralises the pH level of the floor after the use of strong alkaline cleaning products like Tile Doctor Remove and Go. The floor was rinsed again afterwards, and the soiling extracted with a wet vacuum before leaving it to dry off overnight.

Sealing a Victorian Tiled Hallway Floor

The next day the moisture levels of the tiles were checked with a damp meter to ensure they were dry enough to be sealed. The readings were fine, so I was able to apply a couple of coats of Tile Doctor Colour Grow which is a breathable colour enhancing sealer. This is a super durable product which will give great protection to the floor, especially when it is in a high traffic area such as a hallway.

Victorian Tiled Hallway After Renovation Fulham Victorian Tiled Hallway After Renovation Fulham

My client was amazed with the transformation and said he never expected it to come out as good as it did. I must admit considering the state it was into to start with I can understand his expectations mustn’t have been that high.

Victorian Tiled Hallway After Renovation Fulham

For aftercare I recommended the use of Tile Doctor Neutral Tile Cleaner to maintain the floor, this is a pH neutral product which will ensure the longevity of the newly applied sealer and is mild enough to use every day. Its supplied as a concentrate so you only need a small amount of cleaning fluid to clean the floor and so a one litre bottle will last a while.


Professional Restoration of a Victorian Tiled Hallway in South London

Restoration of an Unloved Victorian Tiled Hallway Floor in Fulham Read More »

Scroll to Top