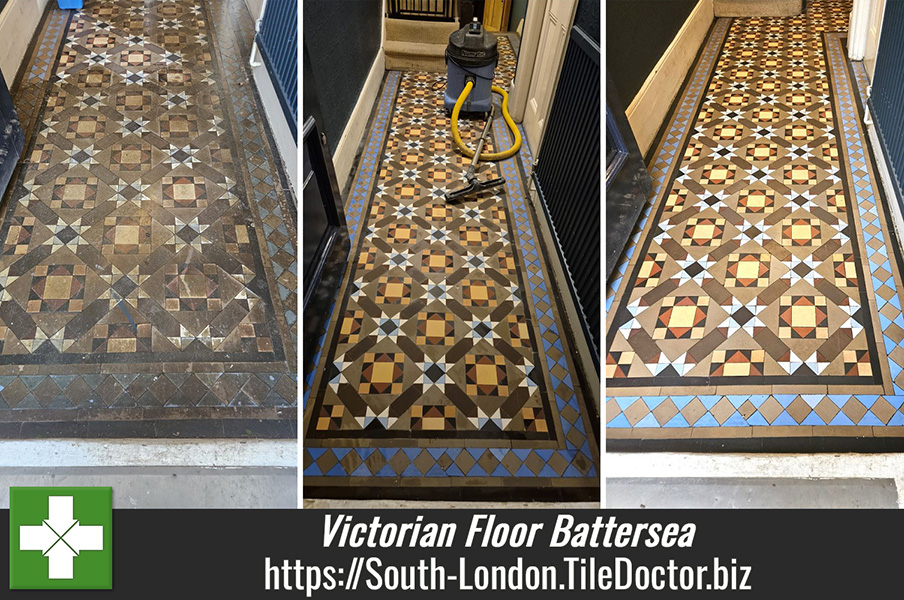
Badly Stained Victorian Tiled Hallway Floor Restored in Battersea
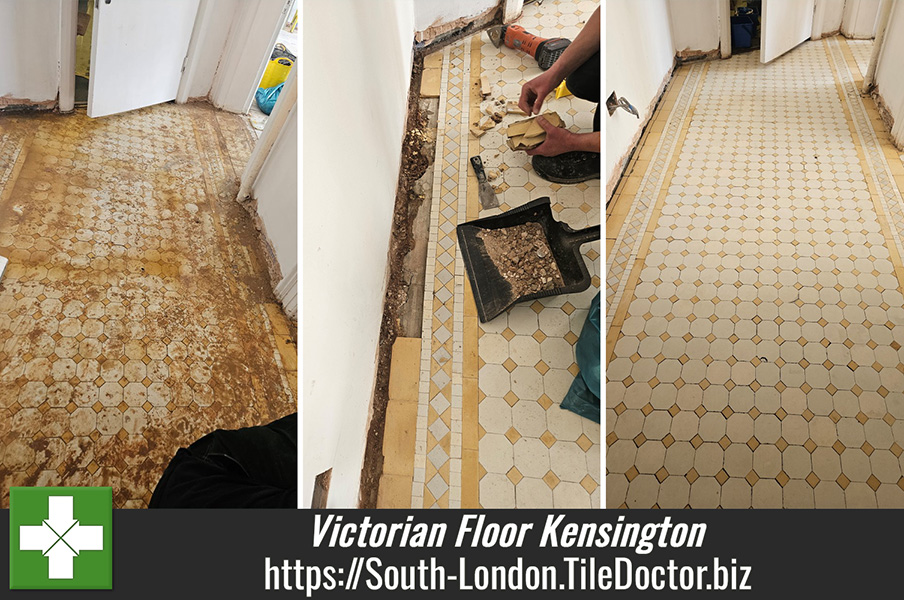
This customer from Battersea discovered a beautiful Victorian tiled floor under the hallway carpet after moving in. The carpet had been secured with thick glue and over the years had accumulated ingrained dirt, multiple sealers, and layers of accumulated grime.

Having visited the property to survey the floor and quote for its restoration I could see it wouldn’t be an easy job. Tests revealed that as well as the glue the tiles had built up several layers of coatings over the years that would need careful attention and repeated scrubbing to remove. That being said the tiles were in good physical condition, and we were confident the floor could be restored to a good standard.
I worked out detailed quote for the work which was accepted and a date agreed for the work to start.
Restorative Cleaning of a Neglected Victorian Tiled Hallway
The restoration process began with a thorough deep clean using Tile Doctor Pro-Clean, an alkaline Tile and Grout cleaner designed to tackle tough stains and dirt. This step was essential to break down the initial layer of grime and dirt, preparing the floor for the removal of old sealers and coatings.
Pro-Clean is ideal for heavily soiled surfaces and when used in a more concentrated form helps to loosen and remove stubborn dirt and residue. The product was applied to the floor, allowing it to dwell and break down the dirt before agitating the surface with a scrub brush. Afterward the floor was rinsed with water, and the now soiled solution was removed with a wet-dry vacuum to ensure no residue was left behind.
To tackle the old sealers and coatings (including adhesives) that had built up over time Tile Doctor Remove & Go was applied. This is a powerful stripper designed to break down and lift off multiple layers of coatings, including synthetic finishes, waxes, and adhesives.
Remove & Go is a non-flammable, multi-purpose stripper with a long dwell time, making it ideal for tough jobs like this one. It draws out ingrained stains and removes grease build-up as it strips away old coatings, preparing the surface for a fresh application of sealer.
A strong dilution of Remove & Go to was applied to the Victorian tiles in small sections allowing to sit for ten to fifteen minutes to soften the coatings before scrubbing with a stiff brush. The residue was so thick in parts it had to be wiped off with paper towels before the wet vacuum could be used to remove the bulk of the stripper. This step took some time, as multiple applications were needed due to the layers of sealers, but it was crucial to ensure the surface was properly prepped.

In some areas, the stripper was not fully effective, and the coatings remained stubbornly in place. For these spots, we had to manually scrape off the remaining layers to ensure the surface was completely free from old coatings. It was a labour-intensive process, but it was necessary to ensure the tiles were thoroughly prepped for the next steps of cleaning and sealing.
Once the sealers and coatings were removed the focus turned to tackling the heavy build-up of dirt, grime and dirt ingrained into the tiles. For this Tile Doctor NanoTech HBU (Heavy Build-Up Remover) was applied, a product designed to penetrate deep into surfaces and breakdown the most stubborn dirt and bring it to the surface. NanoTech HBU uses nano-sized particles to dissolve and lift out embedded dirt, waxes, floor finishes, and grout residue that regular cleaners struggle to remove.
The NanoTech HBU was applied directly to the surface and allowed time to penetrate and break down the build-up. After allowing it to dwell, the surface was agitated with a black pad and scrub brush. Once the residue was loosened, we used the wet-dry vacuum to remove the solution and rinse the area thoroughly with clean water.
After the deep cleaning and heavy build-up removal, the floor was rinsed thoroughly to ensure all cleaning products and residue were completely removed. We used fresh water and a clean mop to wash the surface and removed any leftover residue with the wet-dry vacuum. This was an important step to ensure the floor was completely prepped and ready for re-sealing.

Sealing a Victorian Tiled Hallway
The floor was left for a couple of days to give it time to dry out and then work resumed to add a fresh, protective sealer. It’s essential to allow the tiles to dry completely to ensure the sealer adheres properly and performs as expected.
We recommended Tile Doctor’s Colour Grow for this Victorian tiled floor because this product is designed to enhance the natural colour of the tile whilst providing long-lasting protection. Colour Grow is an impregnator that works by soaking into the pores of the tile protecting it from within and thereby keeping dirt on the surface where it can be easily cleaned away.
After applying the Colour Grow, the sealer was left to cure, allowing the sealer to fully penetrate and protect the tiles. This final step ensured that the Victorian tiles were not only restored to their original beauty but also sealed for long-term protection.

After completing the restoration, the results were stunning. The Victorian tiled floor that was once covered in layers of grime and sealers, now shone with vibrant, clean tiles and fresh grout lines. The customer was thrilled with the outcome, as the tiles looked brand new while maintaining their original charm. The owner could not believe the transformation. They were thrilled to see their beautiful Victorian tiles restored to their original charm and ready to enjoy for years to come.
For aftercare I recommended they used Tile Doctor Neutral Tile Cleaner which is a mild yet effective tile cleaner that won’t affect the sealer which can be the problem with stronger products.
Professional Restoration of a Victorian Tiled Hallway in London
Badly Stained Victorian Tiled Hallway Floor Restored in Battersea Read More »