surrey

Quarry Tiled Floor Before and After Renovation Coulsdon

Screed Covered Quarry Tiled Floor Renovated in Coulsdon

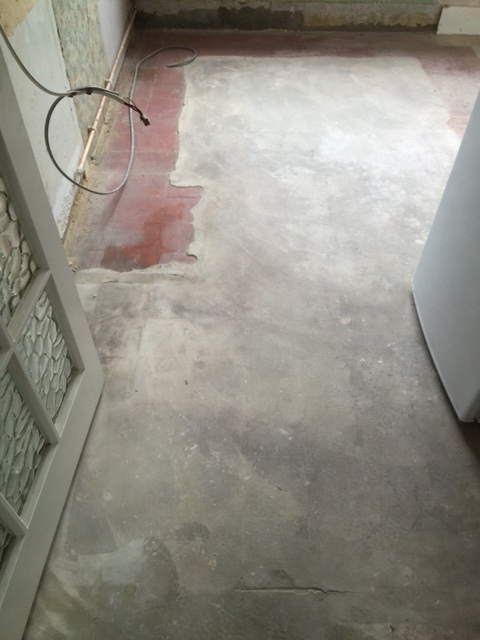
Pictures below of a Quarry Tiled floor that a customer had discovered when taking up the lino at her house in Coulsdon. Realising the floor was original and worth saving she contacted Tile Doctor and I popped round to take a look.

A lot of the tiles had been covered in a screed to provide a flat base for the Lino and that would need removing. In order to be sure what treatments would work to remove the screen and successfully restore the Quarry tiles without causing any damage I ran a couple of tests and everything seemed ok.
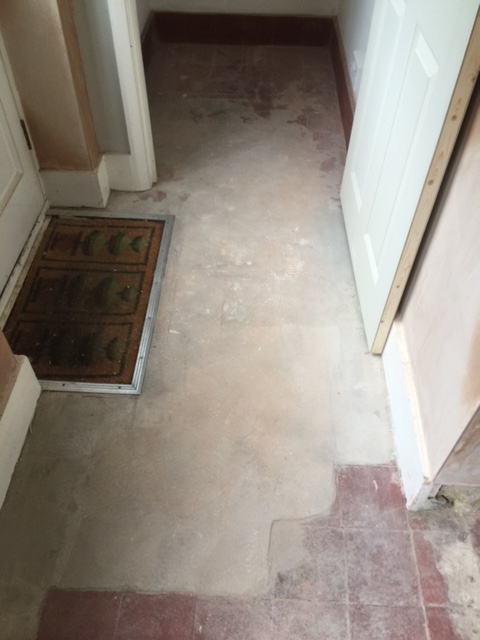
Quarry Tiled Floor Before Renovation Coulsdon Quarry Tiled Floor Before Renovation Coulsdon

We could both see the job wasn’t going to be easy and would take some days to complete so I worked out a price which was accepted and we agreed a date for the work to start.
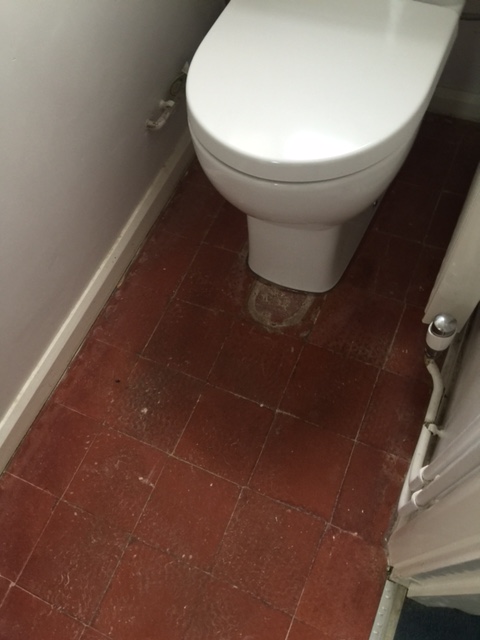
Quarry Tiled Floor Before Renovation Coulsdon Quarry Tiled Floor Before Renovation Coulsdon

Removing Screed from Quarry Tiles

The Quarry tiles in the WC hadn’t been covered in Lino so they would just need a good clean and seal so the main work would be in the Hallway and Kitchen. Fortunately my customer was having a lot of other work done in the house and was in the middle of stripping the walls so I didn’t need to worry too much about protecting the skirting boards etc.

Working in sections I soaked the screed in water and then carefully chipped away at it until it came loose, it was slow work but I could see the process was working as expected and eventually all the Quarry tiles were revealed. There was still a lot of cement from the screed stuck to the surface of the tile so after sweeping up the chippings I set to work applying a strong solution of Tile Doctor Grout Clean-up to the tiles and leaving it to soak in for a short while. Grout Clean-Up is an acidic product that we normally use for removing grout smears from the surface of tiles. The solution was scrubbed in and then rinsed off with water and extracted with a wet vacuum.

Quarry Tiled Floor During Renovation Coulsdon Quarry Tiled Floor During Renovation Coulsdon

To get the tiles in the toilet clean I gave them a good scrub with Tile Doctor Pro-Clean which is a reliable and effective Tile and Grout cleaner. Once clean they were rinsed with water and dried with the wet vacuum.

Sealing Quarry Tiles

I had timed my visit between working being carried out at the property so I was able to leave the floor for a few days so it could thoroughly dry out. I returned later to check the Quarry tiles were dry and completed the renovation by sealing the floor with Tile Doctor Seal and Go which is a water based sealer that works really well on Quarry tiles. Five coats of Seal and Go were needed to fully seal the tiles and the floor now looks transformed.

The owner was very satisfied with the improvements and before leaving I advised to cover the floor before starting the decorating work.

Old Quarry Tiles Restored in Coulsdon, Surrey

Screed Covered Quarry Tiled Floor Renovated in Coulsdon Read More »

Travertine Kitchen Floor Before After Sealing Sanderstead

Renovating Travertine Kitchen Floor Tiles in Sanderstead

This customer, who lives in Sanderstead located between Croydon and Purley in Surrey had been experiencing difficulties in keeping her beautiful Travertine tiled kitchen floor in good condition. Over the years it had suffered from a heavy build up of dirt and oily stains, not to mentioned a number of cracks and small holes. Needless to say, the customer was keen to have the Travertine tiles and grout renovated and made easier to keep clean.

Travertine Kitchen Floor Before Cleaning Sanderstead Travertine Kitchen Floor Before Cleaning Sanderstead

Restoring Travertine Flooring

To begin the renovation, I applied Tile Doctor Remove and Go across the entirety of the large tiled area. This heavy duty remover breaks down any old sealers and other coatings, leaving the area ready to cleaned or, in this case, burnished.

Burnishing is a method for cleaning and polishing certain types of high-end stone, including Travertine, Marble, and Limestone. Our burnishing system involves the application of four diamond encrusted pads of varying grits. Firstly, I applied the Coarse grit pad, which helps to break down any dirt and stains on the surface of the tiles. Then, I worked my way through the Medium, Fine, and Very Fine pads, using a little water which acts to lubricate the process gradually building the polish on the Travertine. The floor is rinsed with water between the application of each pad to remove the soil that is generated and also give a final rinse at the end before leaving to dry.

To round off the first day of work, I filled any cracks and holes in the Travertine using a colour matching resin which greatly improved the look of the tile.

Travertine Kitchen Floor Cracked Tile Before Repair Sanderstead Travertine Kitchen Floor Cracked Tile After Repair Sanderstead

Sealing Travertine Tiles

The following day I returned to the property to seal the tiles checking first that the floor had dried. I use a moisture meter to do this and it confirmed the floor was dry so I proceeded to seal the floor using our colour intensifying impregnating sealer Tile Doctor Colour Grow. Once that was dry, I added the finishing touches by buffing the floor with a soft white buffing pad. As you can see from the photographs, the combination of a fresh seal and polish worked wonders.

Travertine Kitchen Floor After Sealing Sanderstead
We did such a good job with the floor that the customer asked if we could also improve the appearance of their natural stone fireplace which was suffering from bad rust and oil stains however I do a separate write up on that.

Travertine Kitchen Floor After Sealing Sanderstead
 

Cracked Travertine Tiled Kitchen Floor Fully Restored in Surrey

Renovating Travertine Kitchen Floor Tiles in Sanderstead Read More »

Terracotta Tile after cleaning and sealing

Terracotta Tiled Floor Sealing

We were consulted on this Terracotta Tiled floor because the owner complained that whenever she cleaned and sealed them they always got dirty quickly. I asked how many coats of seal was used on the floor and as it turns out only two coats were used because that was the instructions on the bottle. I suspect the bottle hadn’t listed Terracotta specifically and I informed the owner that with this type of floor the minimum amount of coats would be seven, she was very surprised by this but the fact is Terracotta is very porous.

Cleaning Terracotta Tile

I started the job using a strong solution of Tile Doctor Pro-Clean, which is a heavy duty alkaline product ideal for cleaning tiles, scrubbed in with a black pad fitted to a rotary machine. I had to repeat this about five times and also used a steamer to clean out the grout lines and any bits left on the tiles, once this was done I thoroughly rinsed the floor to remove any remaining chemical and left it to dry overnight.

Terracotta Tile Before Cleaning

Sealing Terracotta Tile

I left the floor to dry overnight and the next day came back to do the sealing. There were a couple of spots that needed further attention which were tackled using the steamer which has the added advantage to neutralising the floor and evaporating leaving the floor dry again. Tile Doctor Seal and Go was used to seal the floor, it’s a water based sealer so it doesn’t give off an odour when it’s drying and also offers durable stain protection together with a low sheen finish. In the end the floor actually took nine coats of sealer before it was fully sealed, which naturally took a long time to apply as you have to wait for it to dry before applying the next coat.

Terracotta Tile after cleaning and sealing
The lady was extremely happy and said it turned out exactly as she had always wanted it to.

Terracotta Floor Cleaned and Sealed in Surrey

Terracotta Tiled Floor Sealing Read More »

Scroll to Top