brixton

Natural Black Slate Bathroom Floor Tile Renovation Brixton

Black Slate Tiled Bathroom Floor Transformed in Brixton

This bathroom floor at a property in Brixton was laid with natural Black Slate tiles around five years ago and then badly restored/cleaned three years ago. Some of the more noticeable problems included a build-up of limescale on top of old patchy grout paint and the sealant on the slate was failing allowing the tiles to absorb dirt. The result was a a very unappealing and grubby looking floor.

Natural Black Slate Bathroom Floor Tiles Before Cleaning Brixton

Unhappy with what could be a stunning Black Slate floor the owner contacted Tile Doctor and I was asked to visit the property, survey the tiles, and provide a quote for its renovation.

Cleaning a Natural Black Slate Tiled Bathroom Floor

To get the grout clean of dirt it was scrubbed with a stiff brush and a strong dilution of Tile Doctor Pro-Clean. The grout was then spot treated with Tile Doctor Grout Clean-Up to help remove the old grout paint and a ready mixed grout used to fill gaps where the grout had become dislodged.

Next, I addressed the slate tiles and applied Tile Doctor Remove and Go to remove what was left of the old sealer, the solution was left on the tiles for ten minutes and then agitated with a brush to dislodge the old sealer and dirt. The floor was then rinsed with water and the soil extracted with a wet vacuum.

Once done I could see more work was needed so a 200 grit 6-inch pad was fitted to a hand-held buffer and run over the tiles to further clean up the tiles along with a carbide brush to help reduce the lippage between the tiles. Once done the floor was rinsed and extracted again with water multiple times to ensure no trace of products was left on the Slate.

Sealing a Natural Black Slate Tiled Bathroom Floor

The floor was left for a few hours so it could dry and when dry sealed with two coats of Tile Doctor Colour Grow applied with a paint pad and cloth to add protection and to make the dark shades in the stone stand out.

To complete the look a Tile Doctor Black Grout Colourant was then applied to the grout lines so it would match the dark Slate better. The colourant has the added advantage of sealing in the grout and making it much easier to keep clean.
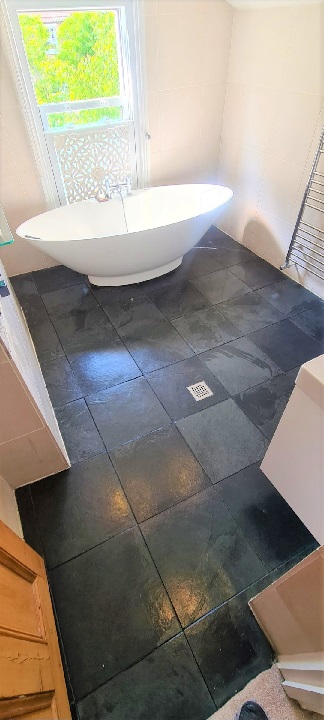
Natural Black Slate Bathroom Floor Tiles After Renovation Brixton

My client was very pleased with the transformation and left the following feedback for me which is always appreciated:

“Really excellent job from Daniel & team. My natural slate bathroom floor looks better than when it was first laid. Superb communication and finished job. I can’t recommend them enough. 5*”

The client has since asked us to come back to complete more works on the Limestone bathroom walls which of course we are happy to oblige!

For aftercare I recommended the use of Tile Doctor Neutral Tile Cleaner for the regular cleaning of tiles. This pH neutral product will keep the limescale at bay and eliminates the build-up of soap, it is mild enough to use every day and has a nice fresh smell.


Professional Renovation of Black Slate Tiled Bathroom Floor in South London

Black Slate Tiled Bathroom Floor Transformed in Brixton Read More »

Victorian Hallway Renovation Brixton Hotel

Restoring a Victorian Hallway Floor in a Brixton Hotel

This Victorian floor was found during the refurbishment of a hotel in Brixton, South London. The manager wanted a practical surface that could cope with day-to-day traffic and given this was a period feature of the property why not bring it back into use. Working in a narrow corridor in a busy hotel would normally be very difficult but as the property was being renovated there were only a few people around so it wouldn’t be an issue.

Victorian Hallway Renovation Brixton Hotel Before Restoration Victorian Hallway Renovation Brixton Hotel Before Restoration

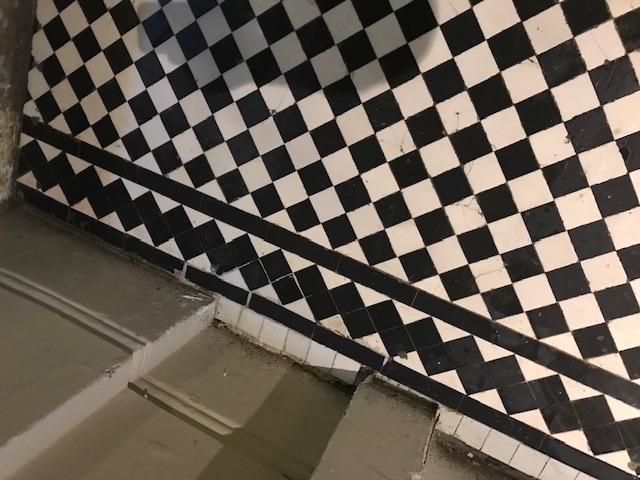
The tiles were stained black with dirt and grease and badly damaged around the perimeter which was probably the reason it was covered up in the first place. Not a problem though, in fact these old Victorian tiled floors are very resilient and I have renovated floors in worse condition than this.

Cleaning and Repairing a Victorian Tiled Hallway Floor

To tackle the dirt and grease the floor was sprayed with a combination of Tile Doctor Pro-Clean mixed with Tile Doctor Remove and Go which was left to soak in for ten minutes and then scrubbed in with a black pad fitted to a rotary machine. This process was repeated several times rinsing off the soiling with water and extracting with a wet vacuum after each clean.

Once most of the dirt and grease had been removed repairs were carried out starting with the removal of the broken tiles and rubble. The subfloor was then built up with a self-levelling compound and then once set re-tiled with matching replacements. Luckily, there are a few places that we can source either original reclamation Victorian tiles or reproduction tiles that are usually a very good match.

Victorian Hallway Renovation Brixton Hotel During Restoration Victorian Hallway Renovation Brixton Hotel During Restoration

The next stage was to further clean up the tiles by giving the whole floor an acid rinse using Tile Doctor Grout Clean-up which has several benefits which include the removal of mineral deposits such as grout smears and alkaline salts. Salts in particular can be a problem with old floors like this as they were laid before the invention of damp proof membranes. Additionally using an acidic product at this stage neutralises the pH level of the floor after the use of strong alkaline cleaners earlier in the restoration. The floor was then left to dry out overnight.

Victorian Hallway Renovation Brixton Hotel During Restoration Victorian Hallway Renovation Brixton Hotel After Restoration

Sealing a Victorian Tiled Hallway Floor

We returned the following day to seal the tiles. First checking the moisture level of the tiles with a damp meter to confirm the floor was dry, which it was. Tile Doctor Colour Grow was chosen as the sealer, it’s an impregnator that soaks into the pores of the tile protecting it from within. It is also a breathable sealer so will cope with any moisture rising through the floor

Victorian Hallway Renovation Brixton Hotel After Restoration

As you can see from the pictures the hallway was transformed, the previously dark dingy space was now bright and clean, and the tiles looked stunning. Our client was very happy with the result and once all the renovations are completed, he will be ready to re-open the hotel.

Victorian Hallway Renovation Brixton Hotel After Restoration


Professional Restoration of a Victorian Tiled Hallway in a South London Hotel

Restoring a Victorian Hallway Floor in a Brixton Hotel Read More »

Old Victorian Tiled Hallway Fully Restored in Brixton

Old Victorian Tiled Hallway Fully Restored in Brixton

I was asked to look at an old Victorian Tiled Hallway floor at a house in Brixton, South London. This classic floor had been discovered underneath an old hallway carpet while refurbishment works were being carried out. I went over initially in mid December to survey the floor and talked the owner through a number of similar restorations we had completed in the past. I could see this floor would need a deep clean to remove the years of dirt and also some tiling would needed to be done to tile a section of concrete near the stairs that had been dug out to lay pipe work when central heating had been installed many years prior. She didn’t want to make a commitment at that point so I left her with our quotation so she could think it over. I suspect she had other quotes to review however I’m pleased to say that she decided to give the work to us.

Victorian Tiled Hallway Before Restoration Brixton Victorian Tiled Hallway Before Restoration Brixton

Once we had agreed a date to do the work I started looking around for replacement tiles that would be needed to restore the floor. Unfortunately the octagonal ones are not made any more and I couldn’t hold of any salvaged ones either. Having been involved in Tile Restoration work for some time now, I have a list of companies and reclamation yards that are usually a good source for these materials. To resolve the problem I sourced square tiles with a similar look and would cut them to the same shape when on site.

Victorian Tiled Hallway Before Restoration Brixton

Cleaning and Repairing a Heavily Soiled Victorian Tiled Floor

I returned after Christmas to start the restoration process which was due to take two to three days. To start the restoration process we applied a strong dilution of Tile Doctor Remove and Go to the floor, allowed it to soak in for ten minutes and then worked it into the tiles using a scrubbing pad fitted to a rotary machine. Remove and Go is a product that removes coatings from tiles including in this case old paint splashes and carpet adhesive. The floor was then rinsed and the now dirty solution extracted using a wet vacuum.

Victorian Tiled Hallway During Restoration
Once this was finished the floor was looking cleaner and the next step was to tackle the concrete area near the stairs where the heating pipes had been buried. The cement had to be carefully chipped away and then refilled with fresh cement but to the level of the original surface so we could lay new tile on top. We use a quick setting compound for this and were able to start relaying and grouting the section with new specially cut tiles later that afternoon.

Victorian Tiled Hallway During Restoration Brixton Victorian Tiled Hallway During Restoration Brixton

Naturally the strip of new tiles were quite noticeable against the old and although the customer was happy I knew I could get a better result by running a very coarse burnishing pad fitted to a heavy buffing machine over the surface. I used a diamond resin hybrid 50 grit pad to take off the top layer of the tiles and then refinished the surface with a 100 and then 200 grit pad. This did the trick and it was impossible to tell the old and new apart.

After this I carried out an acid wash using Tile Doctor Grout Clean-up diluted with four parts water. The purpose of this was to remove any old grout smears and mineral deposits from the floor as well as counteract any possibility of unsightly efflorescence salts rising up through the tile at a later stage. This is quite a common problem with these old floors which don’t have a damp proof coarse and certainly I could see no trace of a DPC when I dug out the cement around the pipe work earlier.

The last step in the cleaning process was to steam the entire floor and then leave it to dry off fully over the New Year break.

Sealing a Victorian Tiled Floor

I returned on the 2nd of January and after inspecting the floor to ensure it was clean and free of damp I began to seal it using Tile Doctor Colour Grow which is an impregnating sealer that soaks into the pores of the tile protecting it from within and enhancing its appearance in the process. Four coats of sealer were needed and as you can see by the final pictures the final results were outstanding.

Victorian Tiled Hallway After Restoration Brixton
Period features such as old Victorian floors add a lot of value to and the customer was over the moon with the transformation and is so happy she chose to have the floor restored rather than covering it back up with carpet.

Victorian Tiled Hallway After Restoration Brixton
 

Professional Victorian Tiled Hallway Restoration in South London

Old Victorian Tiled Hallway Fully Restored in Brixton Read More »

Quarry Tiled Hallway Floor Cleaned and Sealed in Brixton

Quarry Tiled Hallway Floor Cleaned and Sealed in Brixton

These photographs are from a Quarry Tile Cleaning job we did for a lady in Brixton recently, as you can see from the early pictures they were not only dirty but there was also evidence of an old sealer and splashes of paint on them as well both of which would have to be removed first.

Quarry Tile Kitchen Floor Before Quarry Tile Kitchen Floor Before

Cleaning Hallway Quarry Tiles

The first task we did on arrival was to disconnect her cooker and washing machine which were placed outside in the garden, this would allow us to get at all the tiled areas and also meant there was less to protect.

Working in small sections the next step was to pre-wet the floor tiles followed by adding a dilution of Tile Doctor Remove and Go combined 50/50 with Nanotech UltraClean, these two products combine to make a powerful cleaner/stripper that’s safe to use on tile. The cleaning solution was left to soak into the tile whilst we set up all of our equipment and added protective coverings to the kitchen units, walls and adjoining floors.

After about forty five minutes we re-wet the areas and hand scrubbed the tiles using scouring pads. This process was repeated covering small areas at a time until the kitchen was finished. We then used our scrubbing machine with a medium brush head fitted and thoroughly rinsed the floor to remove any trace of chemical.

We needed the floor dry for sealing so a couple of Turbo blowers we setup to force dry the floor and this took a couple of hours before my moisture meter told me that the floor was dry enough.

Sealing Hallway Quarry Tiles

After discussing sealer choices with the customer it was decided to seal the floor with Tile Doctor Colour Grow which provides a natural finish whilst lifting the natural colours in the tile. Two coats were sufficient and once it had dried we refitted the cooker and washing machine, put all the plinths back and removed all of our protective coverings.

Quarry Tile Kitchen Floor After Quarry Tile Kitchen Floor After

The lady was really pleased with our work and left the following testimonial.

“Bill did a fantastic job on my kitchen floor, I can’t thank him enough. Mrs Scott, Brixton”

Quarry Tile Kitchen Floor Before and After
 

Quarry Tile Renovation in Brixton

Quarry Tiled Hallway Floor Cleaned and Sealed in Brixton Read More »

Terracotta Tiled Floor Sealing

Terracotta Tiled Floor Sealing

Although officially the East Surrey Tile Doctor we often get requests further afield through customer recommendations, this particular Terracotta Tiled floor was in Brixton, South London. You can see from the photographs below that the floor was not looking its best and had been splashed with paint.

Terracotta Tile Cleaning

To get the tiles clean we applied a strong dilution of Tile Doctor Pro-Clean mixed 50/50 with NanoTech Ultra Clean which combines well to produce a heavy duty alkaline cleaner/coatings stripper with a cleaner containing tiny nano sized abrasive particles that work deep into the floor. This combination is ideal for dealing difficult floors, its best to let it dwell on the floor for 10 to 20 minutes before working it into the tiles with a rotary machine fitted with a black scrubbing pad.

Terracotta Restoration Before Photo
Once that was done the soiled solution was removed from the floor using a wet vacuum and we were then able to see a few spots where old wax remained on the floor. To deal with the wax Tile Doctor Remove and Go, which is a powerful coatings remover, was applied to the floor and left to dwell for a while before rinsing thoroughly with clean water and then treated with a steam cleaning machine to ensure the floor had been neutralised of all chemicals. It’s important not to leave a trace of chemical on the floor as they could react with the sealer.

The floor was still quite wet at this stage with small puddles of water forming in the dips of the uneven floor; the wet vacuum took care of most of this but the floor was still too damp for sealing so I left a couple of air blowers to assist with the drying of the floor and returned two days later to start the sealing.

Terracotta Restoration Before Photo

Terracotta Tile Sealing

When we returned the floor was mainly dry but there were a couple of damp spots which I took care of with a heat gun. Tile Doctor Seal and Go was used to seal the floor; Terracotta can be very porous so eight coats were required to completely seal the floor so it was some time before it was finished.

Terracotta Restoration After Photo Terracotta Restoration After Photo

When I finished I gave the customer instructions on how to maintain the floor. He was over the moon with the result and said that it had far exceeded his expectations.

Another happy customer.

Terracotta Restoration Before and After
 

Terracotta Floor Cleaned and Sealed in Brixton

Terracotta Tiled Floor Sealing Read More »

Scroll to Top