Clapham Tile Cleaning

Clapham Tile Cleaning

Welcome to my Work History archive where you will find examples of the cleaning and renovation of tiles carried out in Clapham.

Bathroom Floor Grout Restoration in Tooting SW17

Bathroom Floor Tile Grout Restoration in Tooting SW17

A client was renovating a house in Tooting and wanted to see what could be done to improve the Ceramic floor tiles in the bathroom without the expense of a major overhaul. Having discussed the floor over the phone I was confident it could be improved and agreed a date to come over and survey the tiles and provided a quote for their renovation.

Bathroom Floor Grout Before Restoration in Tooting SW17

Except for one cracked tile, the tiles were in good condition and I could see it was really the grout that was bringing the bathroom down. The grout was generally discoloured and some had cracked and become loose. This cracking issue is indicative of using an inflexible grout when tiling on a wooden floor as these floors tend to have a bit of movement in them.

I discussed my renovation plan with the customer and provided a quote for carrying out the work which was accepted.

Renovating Bathroom Floor Grout

On the first day I set about raking out the cracked grout and stripping out the silicone between the tile and the bath. Silicone seems to attract mould and although it can be cleaned to some extent, I usually find its more effective to simply replace it. I then tidied up the bathroom to remove the waste grout and silicone, so the area was ready for grouting. I used a flexible White grout for this in order to match the original, although most of that was no longer White due to the staining.

I left the grout to set overnight and returned the next day to complete the job starting with the re-application of the silicone sealant, again in White but this time using an anti-mould variety. My attention then turned to the floor tile grouting which of course was now a mixture of fresh new grout and stained grout. I had realised this would be the result, so I had come prepared and was ready to apply Tile Doctor Grout Colourant in white to make everything uniform.

Before applying the colourant, I prepped the grout joint with Tile Doctor Pre-treat cleaner that is an acidic cleaning solution that is sprayed onto the grout and then scrubbed in. This cleans the grout joints, and the acidic nature of the cleaner helps prepare the grout to achieve a better bond with the colourant. The grout was then wiped with a wet sponge to remove the dirt and then dried ready for the colourant. Although the cleaner had helped to clean the grout and remove surface dirt it can’t do anything about deep seated staining, so colouring was still necessary.

Once the grout was dry the White grout colourant was painted onto the grout using a small brush wiping off any excess from the tile as I went. The Tile Doctor range of Grout Colourants come in eleven different colours and form an epoxy barrier over the grout preventing dirt from reaching the grout line and making it much easier to keep clean.
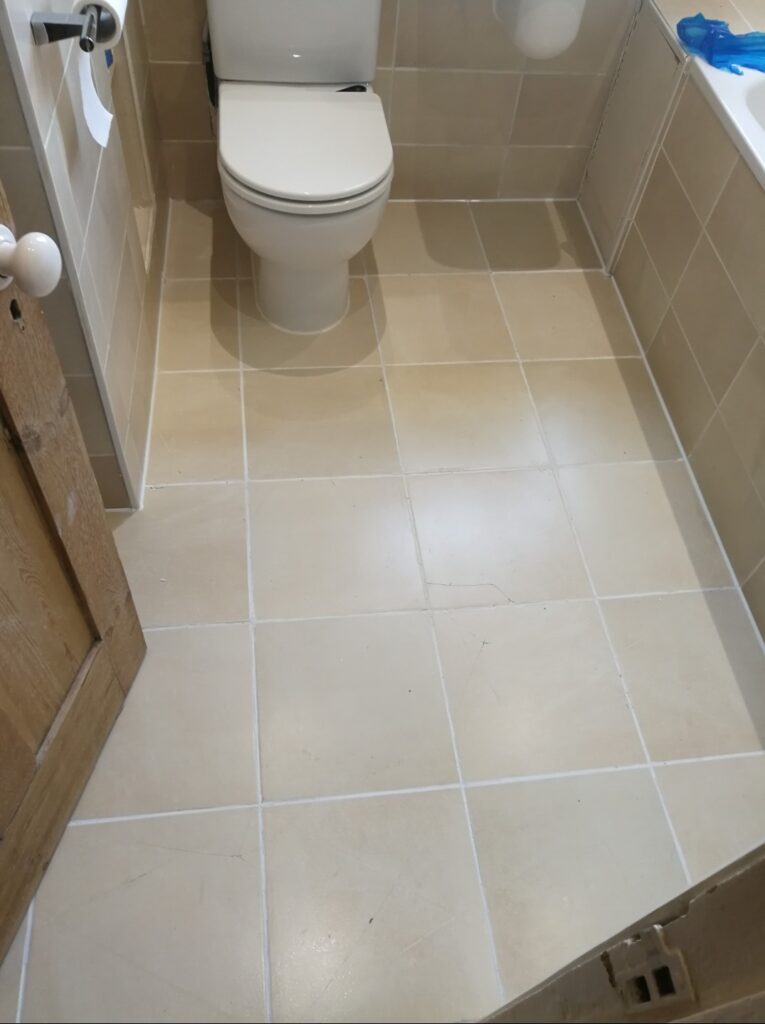
Bathroom Floor Grout After Restoration in Tooting SW17

Once the colourant had dried, I gave the floor a quick clean with Tile Doctor Neutral Tile Cleaner to get the ceramic tiles clean and the job was complete. The refreshed grout now has a consistent white appearance, and it really lifted the appearance of the bathroom.


Professional Restoration of a Bathroom Floor Grout in South London

Bathroom Floor Tile Grout Restoration in Tooting SW17 Read More »

Acid Damaged Black Granite Sink Countertop Renovation Clapham

Renovating an Acid Damaged Black Granite Countertop in Clapham

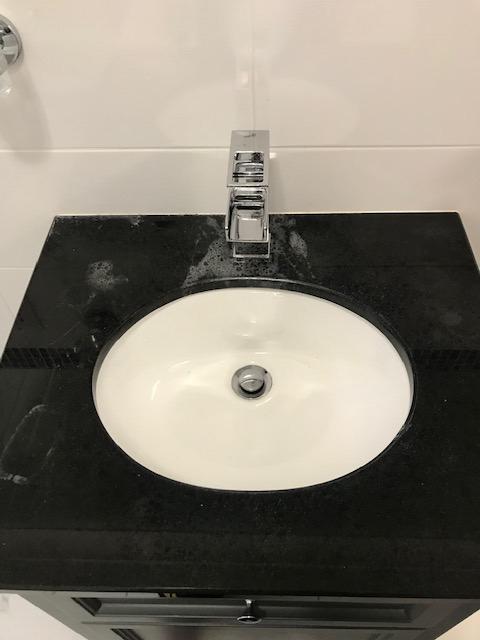
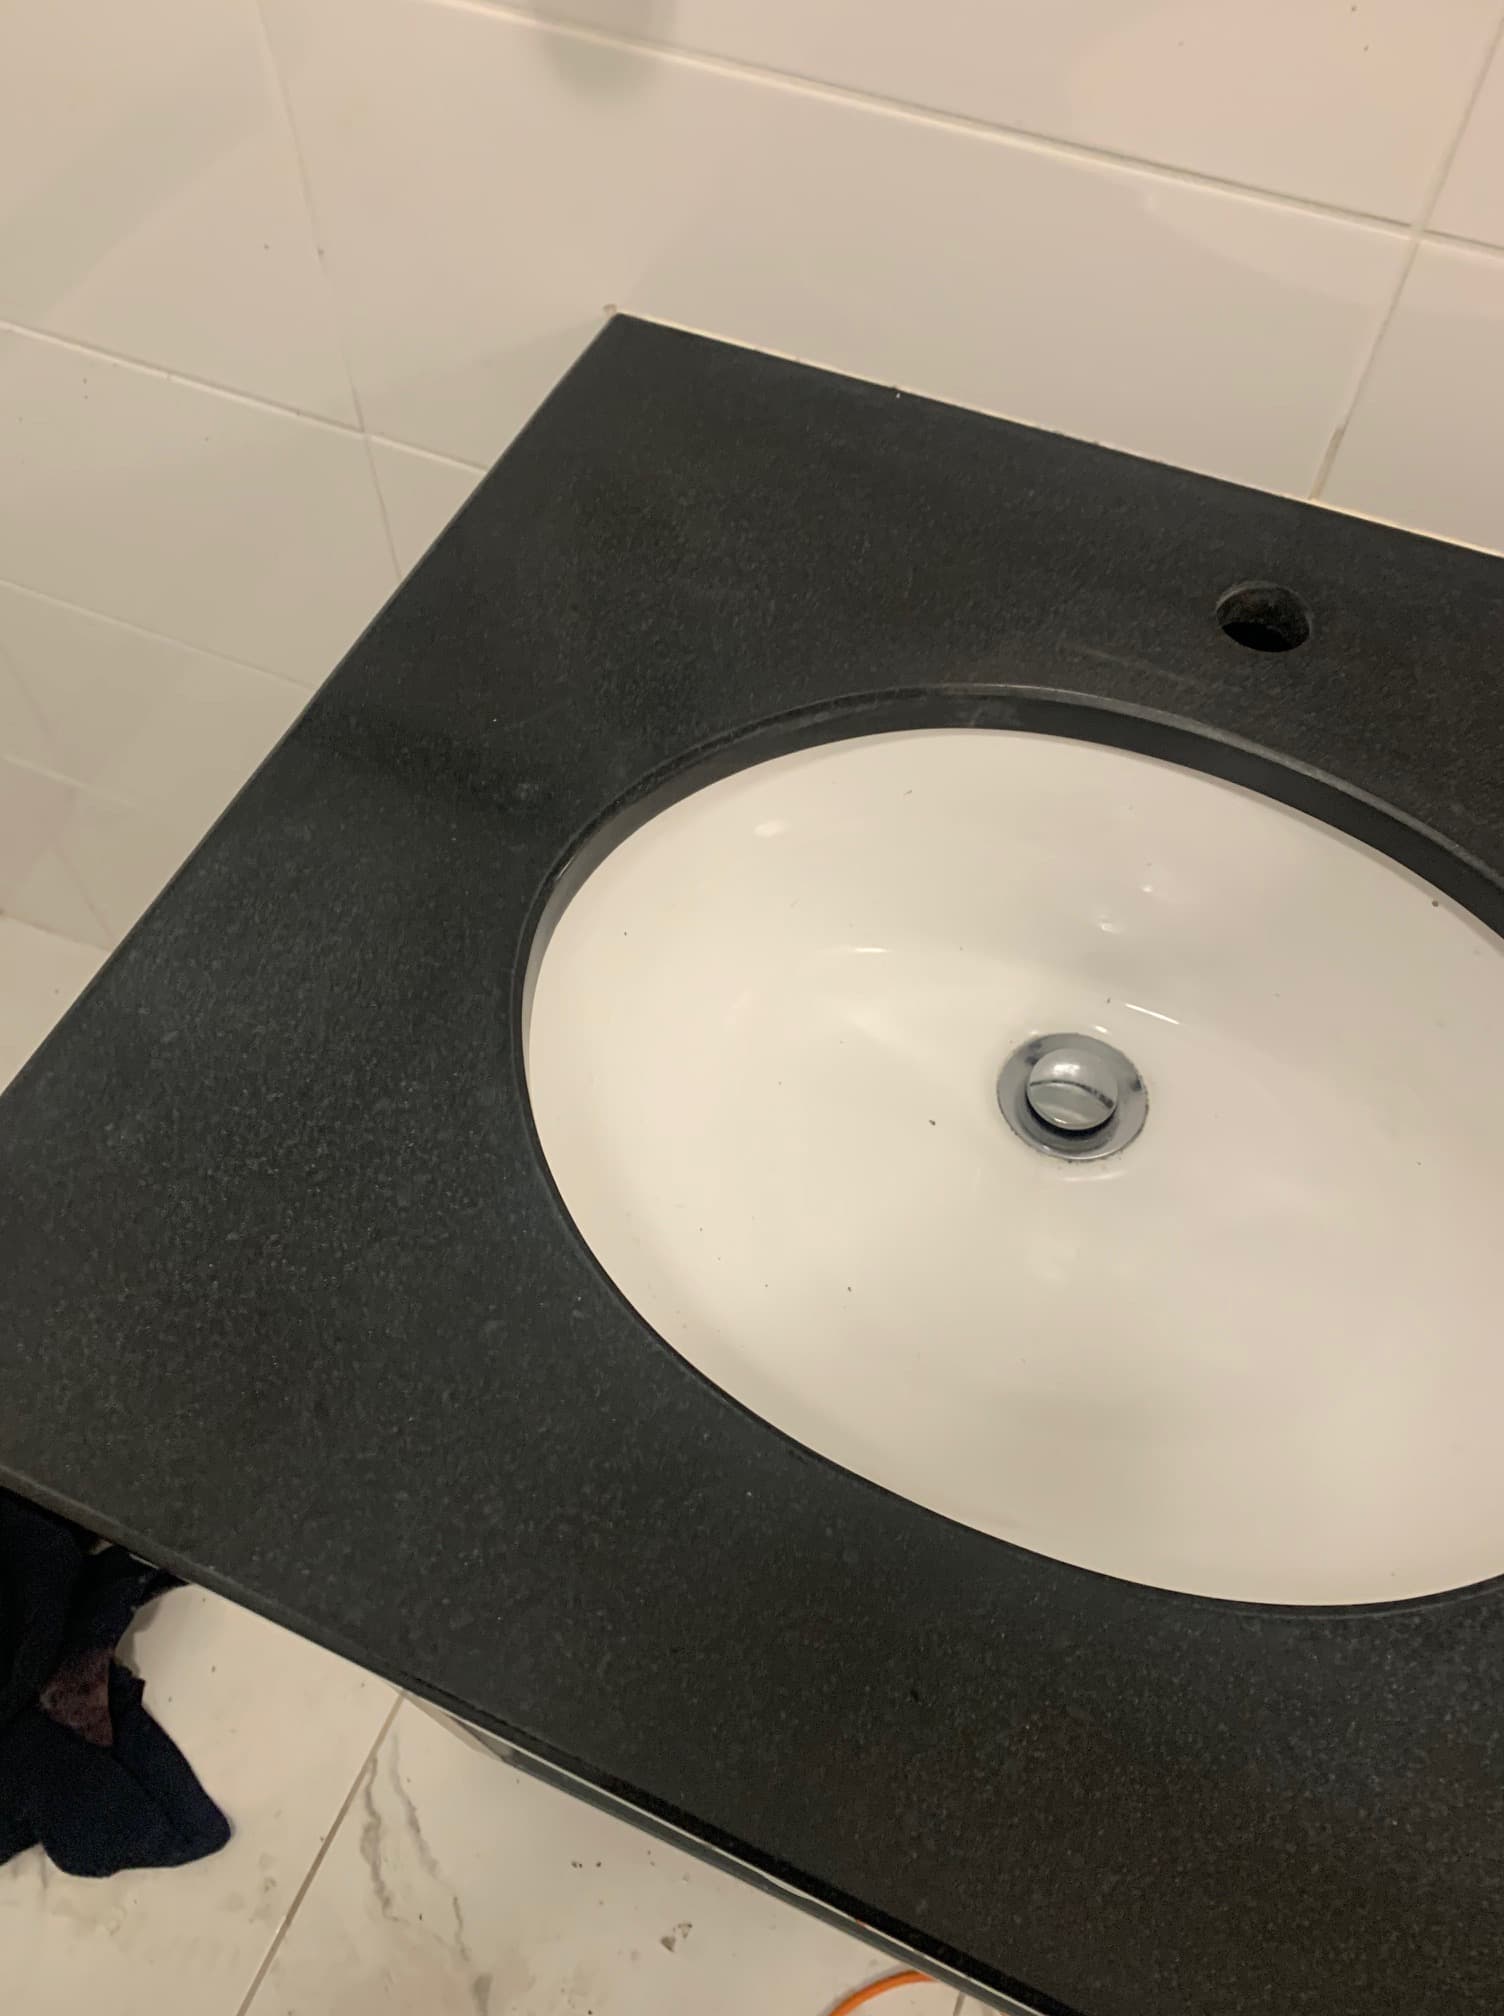
This Black Granite sink countertop was damaged by a cleaning company during an end of tenancy clean at a rental property in Clapham South London. Granite is a very robust stone, but acidic cleaning products will etch it and damage the factory polish thereby ruining its appearance.

Acid Damaged Black Granite Sink Countertop Clapham Before Renovation

Naturally the landlord was not very happy and was considering having it replaced at the cost of the cleaning company who really should have known better. This however would have taken time to source and replace so after searching for a solution on-line I was asked to pop round and see if I could resolve the problem. We don’t just help resolve problems with tiles, jobs like this add a little variety to our day.

Acid Damaged Black Granite Sink Countertop Clapham Before Renovation

The landlord was relieved to hear that the problem could be fixed when I visited site. My solution was to re-polish the granite using a combination of hand-held burnishing blocks and six-inch burnishing pads fitted to a flex machine. He agreed my quote which he passed on to the cleaning company and we arranged a time to get the work done ahead of his new tenant moving in.

Restoring the Appearance of a Granite Countertop

To bring back the appearance of etched Granite we have found its necessary to use various grits of polishing pads and handheld blocks which are made from industrial diamonds. The larger 6-inch pads fit into a handheld buffer which helps to make the process easier.

I started though with the application of a coarse 200-grit hand block to remove the deeper etching from the damaged areas and then moved on to refinishing the surface with the diamond burnishing pads of increasing grits. Water is used to lubricate the process and remove the fine slurry that is generated. I finished on a 3000-grit pad which is applied dry with only a small amount of water to really bring up the polish and ready for sealing.

Sealing a Granite Countertop

To protect the Granite a couple of coats of Tile Doctor Colour Grow sealer was applied. This sealer is an impregnator which soaks into the pores of the stone giving long lasting protection, it’s formula also contains a colour enhancer which brought out the dark Black colours in the Granite.

Acid Damaged Black Granite Sink Countertop Clapham After Renovation

Once done the countertop looked new again and my the landlord was so happy the problem had been resolved, I’m sure the cleaning company were pleased as well as it saved them lot of hassle and money to replace the countertop. The cleaning company took our details for any future mishaps, hopefully they had learned a lesson though!

The property was now ready for the new tenant.

Acid Damaged Black Granite Sink Countertop Clapham After Renovation Acid Damaged Black Granite Sink Countertop Clapham After Renovation


Professional Renovation of a Granite Countertop in a South London Bathroom

Renovating an Acid Damaged Black Granite Countertop in Clapham Read More »

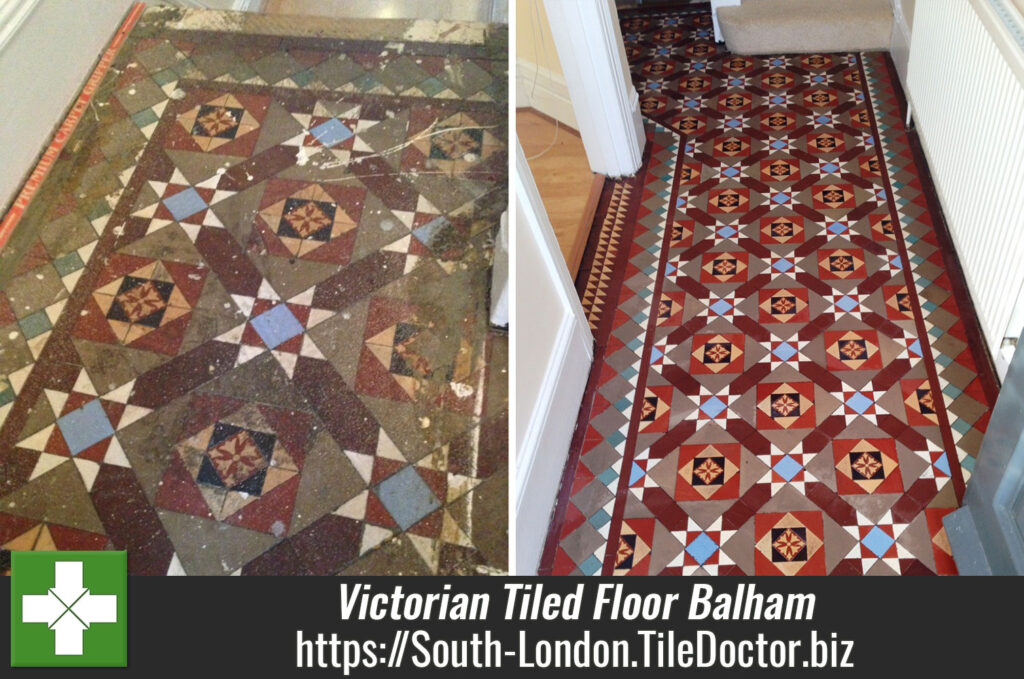
Victorian Tiled Floor Balham Before and After

Restoring a Victorian Tiled floor hidden under Carpet in Balham

This post is from a house in Balham where the owner was doing some renovation work and after deciding to change the flooring in the hallway they discovered an original Victorian tiled floor. They planned to restore the floor unfortunately however their builders did not listen and didn’t bother to put down any protection when decorating leaving it in a worse condition than when they found it.

Victorian Tiled Floor Balham Before Cleaning Victorian Tiled Floor Balham Before Cleaning

Cleaning the Victorian Tiled Floor

To initially clean the floor I put down a 50/50 mixture of Tile Doctor Pro-Clean and Nanotech Ultraclean diluted with four parts water; this creates a powerful alkaline cleaner that is safe to use on tiles and contains tiny abrasive particles to cut through the grime. This solution was left to dwell on the tile for twenty minutes before being agitated using a rotary machine fitted with a black scrubbing pad. This action did well to deep clean the tiles and remove dirt but there was still plenty of other problems to deal with including paint from the decorating and glue from the carpet.

To remove the glue and paint I treated the surface with Tile Doctor Remove and Go which as its name suggest is designed to remove coatings from the surface of tiles without damaging them. Working in sections the product was left to dwell for forty minutes on the surface of the tile before being worked in by hand into the glue and paint. Once it had all been removed I gave the whole floor a scrub with Grout Clean-Up to remove grout from the surface of the tile and this brightened up the colours. Last step was to give the floor a thorough rinse down using clean water, this is quite important and you need to ensure any trace of product has been removed before sealing. The water was removed using a wet vacuum which literally sucks the water off the floor and reduces drying times, the floor was still fairly damp at this stage so we called it a day leaving an air blower in place to help the floor to dry overnight.

Sealing Victorian Tiles

When I came back the next day I decided to seal the tiles using Tile Doctor Colour Grow which is an impregnating sealer that penetrates into the pores of the tile blocking any dirt from getting in and making the tiles easier to clean.

Victorian Tiled Floor Balham After Cleaning Victorian Tiled Floor Balham After Cleaning

Two coats were sufficient and Colour Grow also brings out the colour in the tile improving its look, certainly my customer thought so as all they could say was:

“AMAZING I didn’t think it was possible to get like this.”

Victorian Tiled Floor Balham Before and After
 

Victorian Floor Restoration in Balham

Restoring a Victorian Tiled floor hidden under Carpet in Balham Read More »

Sandstone Tiles Before After Cleaning

Resolving Sandstone Flagstone issues in Clapham

Details below of a Sandstone floor installed in the Kitchen of a house in Clapham, South London. The client had not been happy with the floor since it had been installed because the tiler hadn’t applied the seal correctly. The owner had also had a quote from a stonemason who had recommended grinding off the top later of stone. I explained that that would not be necessary and went on to explain the process to restore it. As it turns out my quote was £500 cheaper that the Stone mason but I was confident I could get as good a result and the customer could see I knew what I was talking about and gave the job to me.

Sandstone Tiles Before Cleaning Sandstone Tiles Before Cleaning

Sandstone Tile Cleaning

I began work on the floor using a coarse diamond burnishing pad fitted to a rotary scrubbing machine with a little water. I slowly scrubbed the floor in small areas and removed the old sealer from the whole tile. The next step was to tackle the grout which was done by applying Tile Doctor Pro-Clean worked in along the grout lines using a stiff grout cleaning brush. After this the pad was replaced on the rotary machine with a medium brush head and the floor was given a good scrub followed by rinsing thoroughly with fresh water.

At this stage it was evident that a couple of stubborn areas were still in need of attention due to the old sealer still being present so Tile Doctor Remove and Go was applied which is a strong sealer stripper and left to dwell for around 40 minutes before being scrubbed in and washed down again.

I can recommend a Wet Vacuum at this point as they are great at removing liquids from floors; at this point I left for the day to allow the floor to dry overnight ready for sealing the next day.

Sandstone Tile Sealing

Then next day when I returned I checked to make sure the floor was dry and ready to seal, there were a couple of little patches I needed to redo and once they were rinsed I dried them using my heat gun. I then sealed the floor with four coats of Tile Doctor Colour Grow and when the last coat had dried I demonstrated to the customer that it was fully sealed using a water test.

Sandstone Tiles After Cleaning Sandstone Tiles After Cleaning

The client was really pleased with the results and that I had saved him so much money and left the following comment on our feedback system.

Bill was great and worked hard to restore and protect the floor. We’re very pleased. There has been some accidental damage outside which I’m happy we’ll sort.
Ian Blandford, Clapham

Sandstone Tiles Before and After
 

Sandstone Tiled Floor Cleaned and Sealed in South London

Resolving Sandstone Flagstone issues in Clapham Read More »

Quarry Tile Kitchen Floor Before and After

Quarry Tiled Hallway Floor Cleaned and Sealed in Brixton

These photographs are from a Quarry Tile Cleaning job we did for a lady in Brixton recently, as you can see from the early pictures they were not only dirty but there was also evidence of an old sealer and splashes of paint on them as well both of which would have to be removed first.

Quarry Tile Kitchen Floor Before Quarry Tile Kitchen Floor Before

Cleaning Hallway Quarry Tiles

The first task we did on arrival was to disconnect her cooker and washing machine which were placed outside in the garden, this would allow us to get at all the tiled areas and also meant there was less to protect.

Working in small sections the next step was to pre-wet the floor tiles followed by adding a dilution of Tile Doctor Remove and Go combined 50/50 with Nanotech UltraClean, these two products combine to make a powerful cleaner/stripper that’s safe to use on tile. The cleaning solution was left to soak into the tile whilst we set up all of our equipment and added protective coverings to the kitchen units, walls and adjoining floors.

After about forty five minutes we re-wet the areas and hand scrubbed the tiles using scouring pads. This process was repeated covering small areas at a time until the kitchen was finished. We then used our scrubbing machine with a medium brush head fitted and thoroughly rinsed the floor to remove any trace of chemical.

We needed the floor dry for sealing so a couple of Turbo blowers we setup to force dry the floor and this took a couple of hours before my moisture meter told me that the floor was dry enough.

Sealing Hallway Quarry Tiles

After discussing sealer choices with the customer it was decided to seal the floor with Tile Doctor Colour Grow which provides a natural finish whilst lifting the natural colours in the tile. Two coats were sufficient and once it had dried we refitted the cooker and washing machine, put all the plinths back and removed all of our protective coverings.

Quarry Tile Kitchen Floor After Quarry Tile Kitchen Floor After

The lady was really pleased with our work and left the following testimonial.

“Bill did a fantastic job on my kitchen floor, I can’t thank him enough. Mrs Scott, Brixton”

Quarry Tile Kitchen Floor Before and After
 

Quarry Tile Renovation in Brixton

Quarry Tiled Hallway Floor Cleaned and Sealed in Brixton Read More »

Terracotta Restoration Before and After

Terracotta Tiled Floor Sealing

Although officially the East Surrey Tile Doctor we often get requests further afield through customer recommendations, this particular Terracotta Tiled floor was in Brixton, South London. You can see from the photographs below that the floor was not looking its best and had been splashed with paint.

Terracotta Tile Cleaning

To get the tiles clean we applied a strong dilution of Tile Doctor Pro-Clean mixed 50/50 with NanoTech Ultra Clean which combines well to produce a heavy duty alkaline cleaner/coatings stripper with a cleaner containing tiny nano sized abrasive particles that work deep into the floor. This combination is ideal for dealing difficult floors, its best to let it dwell on the floor for 10 to 20 minutes before working it into the tiles with a rotary machine fitted with a black scrubbing pad.

Terracotta Restoration Before Photo
Once that was done the soiled solution was removed from the floor using a wet vacuum and we were then able to see a few spots where old wax remained on the floor. To deal with the wax Tile Doctor Remove and Go, which is a powerful coatings remover, was applied to the floor and left to dwell for a while before rinsing thoroughly with clean water and then treated with a steam cleaning machine to ensure the floor had been neutralised of all chemicals. It’s important not to leave a trace of chemical on the floor as they could react with the sealer.

The floor was still quite wet at this stage with small puddles of water forming in the dips of the uneven floor; the wet vacuum took care of most of this but the floor was still too damp for sealing so I left a couple of air blowers to assist with the drying of the floor and returned two days later to start the sealing.

Terracotta Restoration Before Photo

Terracotta Tile Sealing

When we returned the floor was mainly dry but there were a couple of damp spots which I took care of with a heat gun. Tile Doctor Seal and Go was used to seal the floor; Terracotta can be very porous so eight coats were required to completely seal the floor so it was some time before it was finished.

Terracotta Restoration After Photo Terracotta Restoration After Photo

When I finished I gave the customer instructions on how to maintain the floor. He was over the moon with the result and said that it had far exceeded his expectations.

Another happy customer.

Terracotta Restoration Before and After
 

Terracotta Floor Cleaned and Sealed in Brixton

Terracotta Tiled Floor Sealing Read More »

=================================

South London Tile Doctor

================================= Read More »

Scroll to Top