Putney Tile Cleaning

Putney Tile Cleaning

Welcome to my Work History archive where you will find examples of the cleaning and renovation of tiles carried out in Putney.

Victorian Tiled Hallway Floor Renovated Fulham

Restoration of an Unloved Victorian Tiled Hallway Floor in Fulham

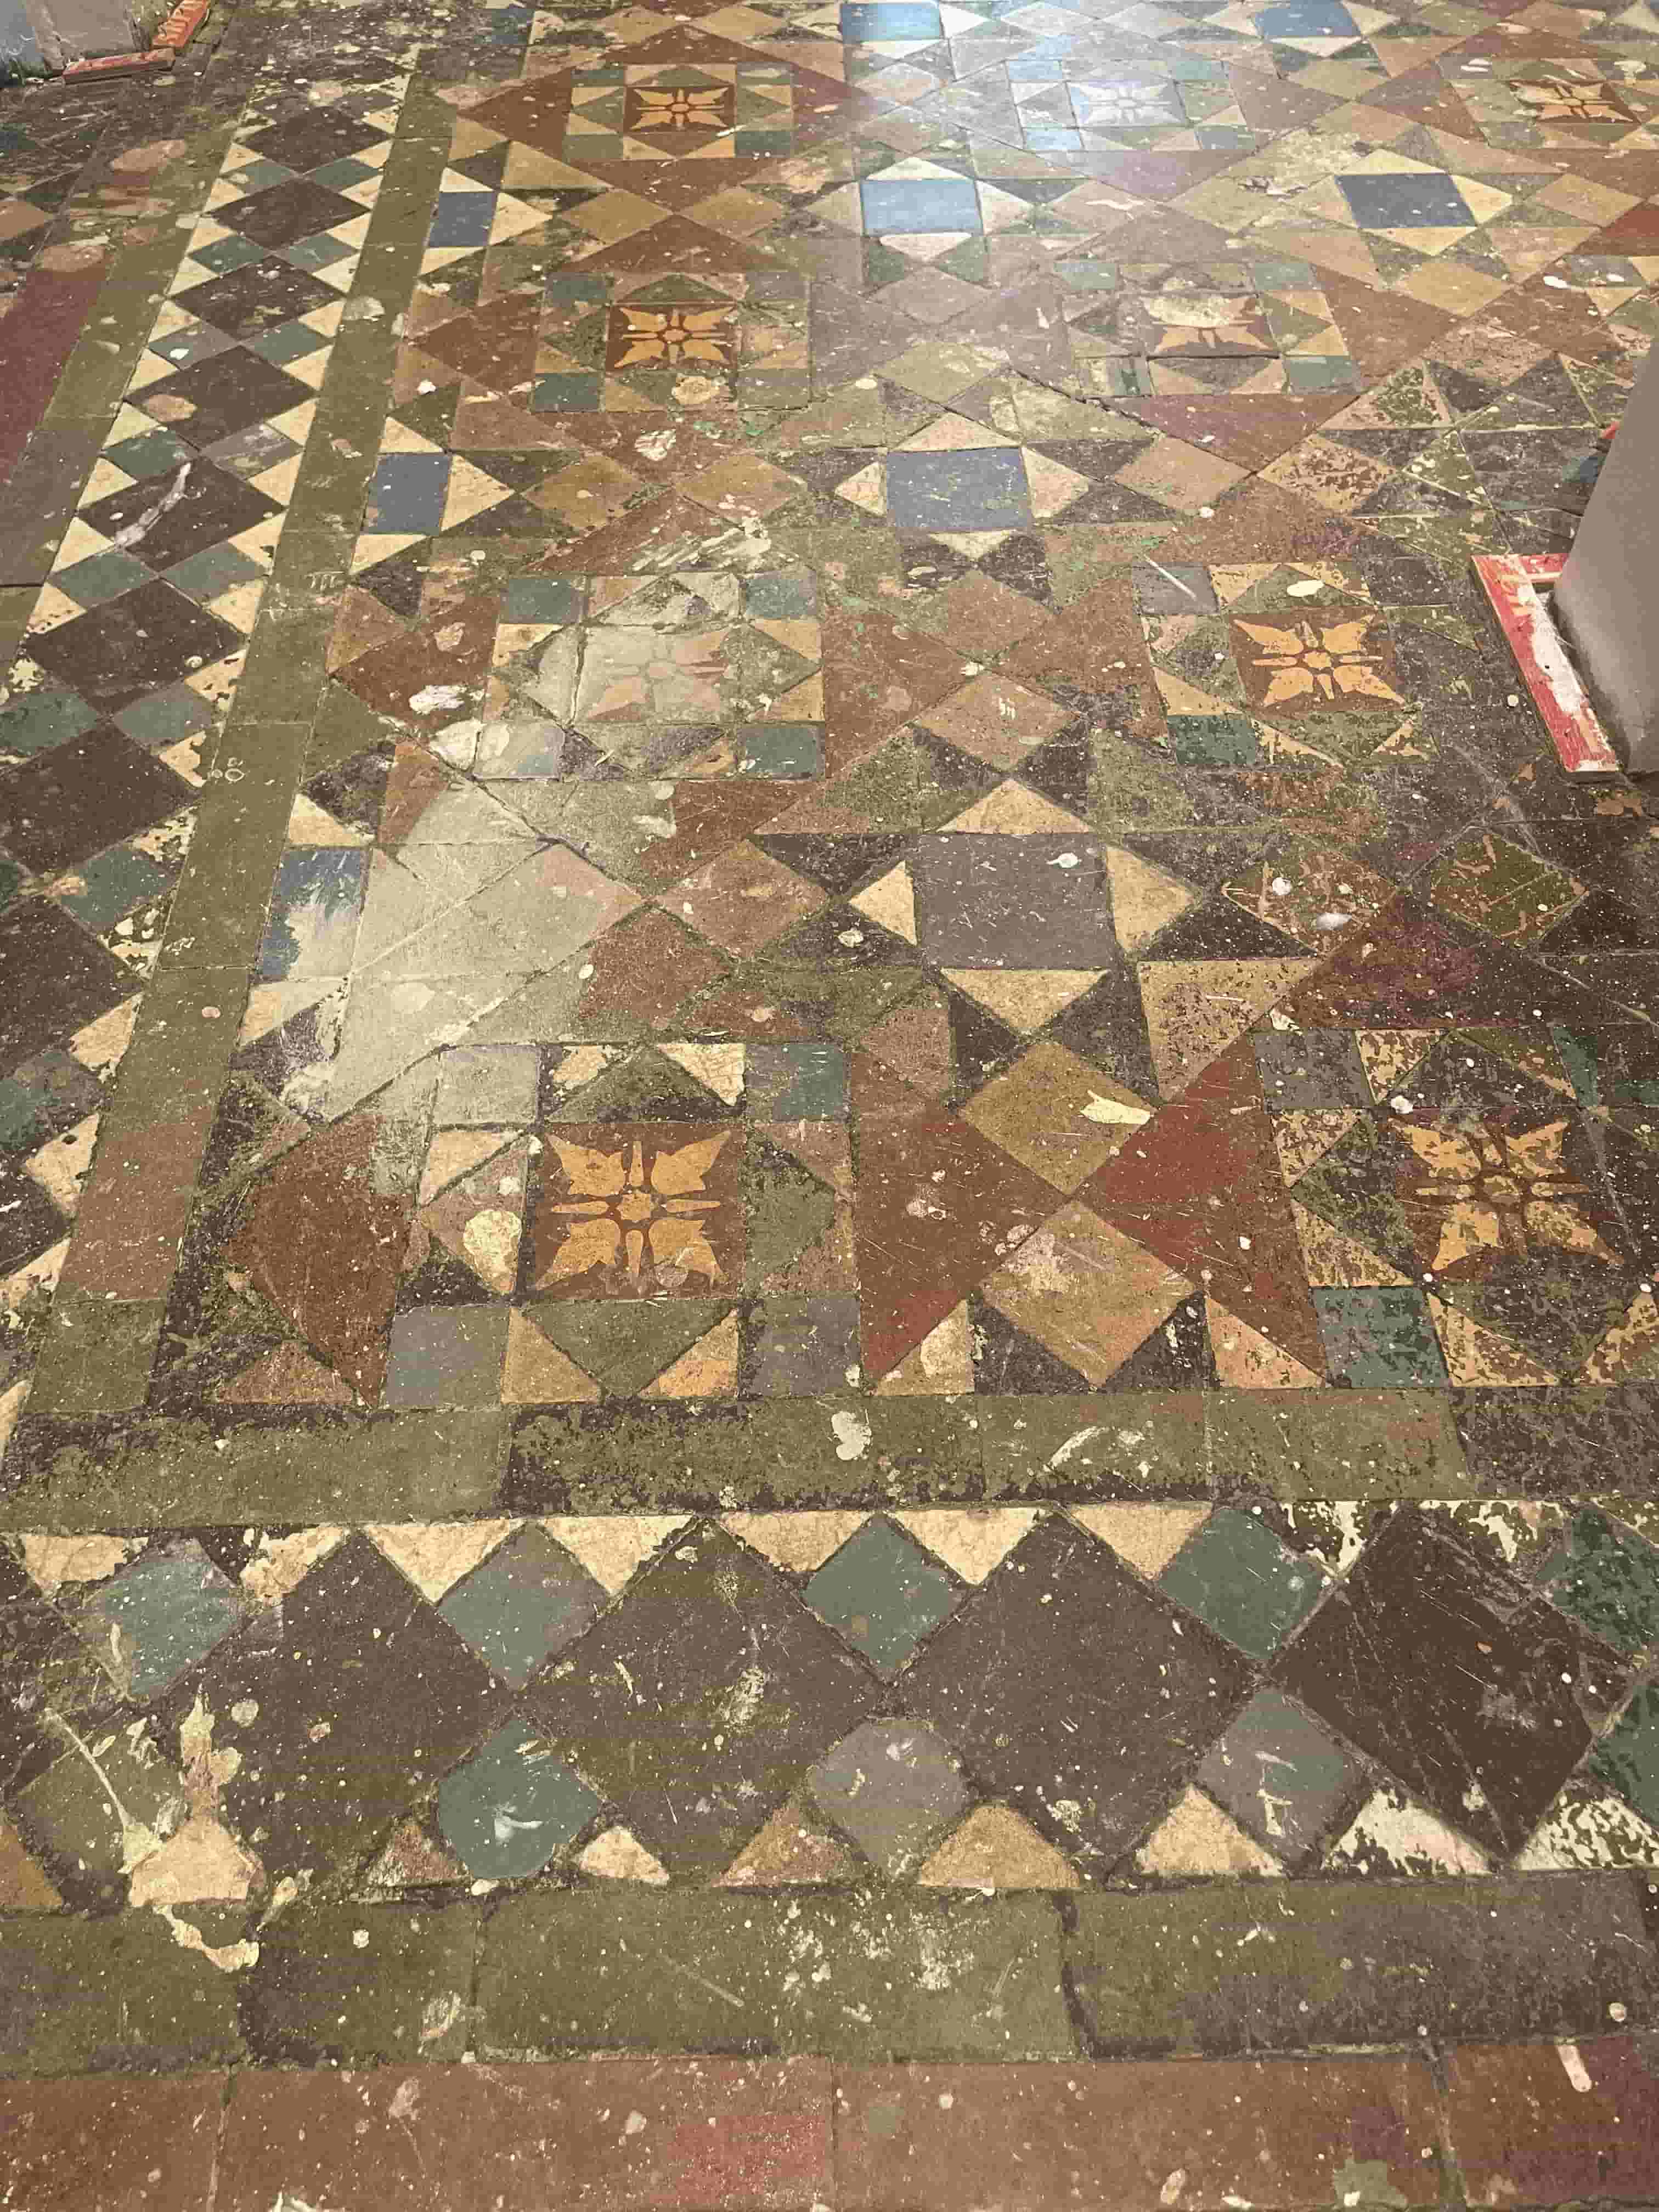
I received a request to quote for the restoration of this Victorian tiled floor in the hallway of a property in Fulham which as you can see from the photographs was in a very poor condition.

Victorian Tiled Hallway Before Cleaning Fulham

I visited the property to survey the floor and could see that except for a few loose tiles it was in good physical condition. From experience I knew it would respond well to a deep clean and seal so I carried out a test clean on a small area to demonstrate its potential. The tiles came up well and my client was satisfied it would be worthwhile to have it restored.
Victorian Tiled Hallway Before Cleaning Fulham Victorian Tiled Hallway Before Cleaning Fulham

When you have period features such as this floor in a property it is a shame not to make the most of them, they are sought after and will increase its value. Having agreed my quote, we arranged to carry out the work the following week.

Cleaning a Victorian Tiled Hallway Floor

To get all the dirt out of the pores of the tiles I first applied a strong dilution of Tile Doctor Remove and Go and after leaving it to soak in for ten minutes was scrubbed in with a black pad. I also used a steam cleaner during this process to help lift the dirt out of the pores. From what I could tell the tiles had a variety of contaminants including paint, plaster, cement, and dirt. Luckily Tile Doctor Remove and Go can handle all of these. I had to repeat the process on the stubborn stains and then removed all the slurry and dirt using a wet vacuum.

I then moved onto the loose tiles which needed to have the old adhesive removed from the tile and the base. The original tiles were then cleaned up by hand before new rapid setting adhesive was applied to secure them back into the floor.

Once the loose tiles had set, I moved onto the next step of giving the floor an Acid Rinse using Tile Doctor Acid Gel. This cleans up the tiles further by removing old grout smears and dissolving efflorescent salts in the floor. This is a common in properties of this age which don’t have a damp proof membrane to stop moisture rising through the tile. This process also neutralises the pH level of the floor after the use of strong alkaline cleaning products like Tile Doctor Remove and Go. The floor was rinsed again afterwards, and the soiling extracted with a wet vacuum before leaving it to dry off overnight.

Sealing a Victorian Tiled Hallway Floor

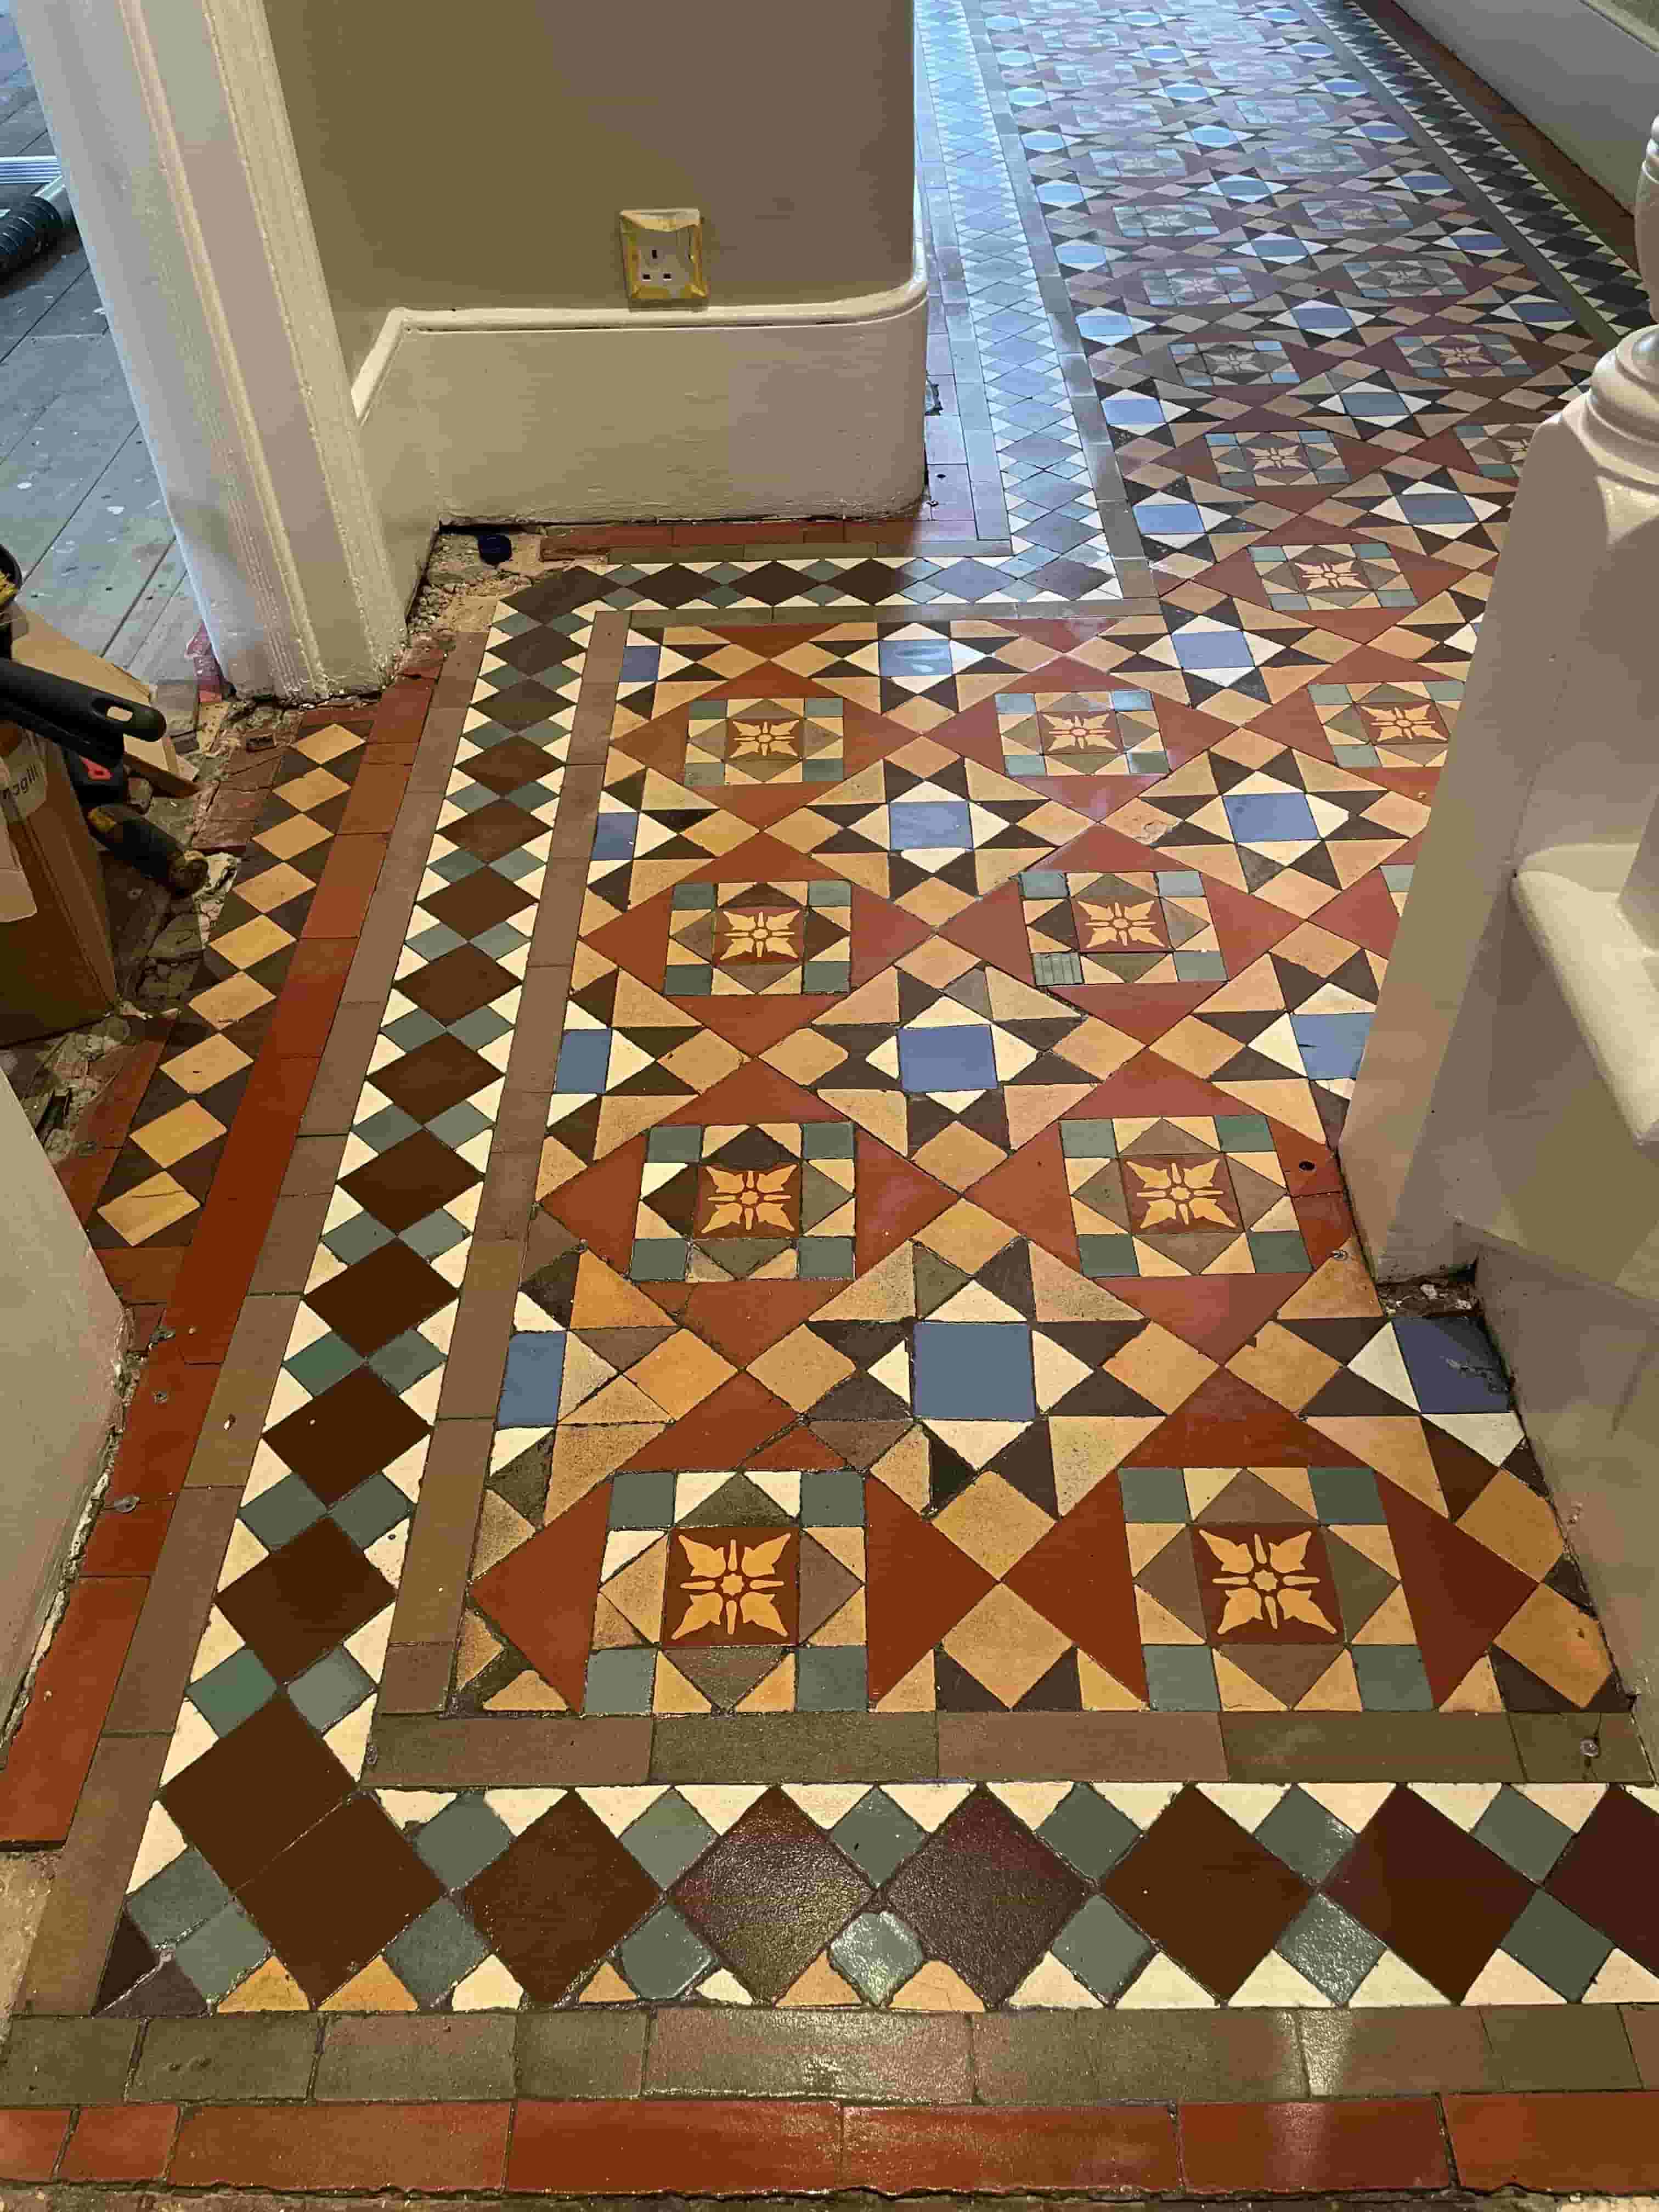
The next day the moisture levels of the tiles were checked with a damp meter to ensure they were dry enough to be sealed. The readings were fine, so I was able to apply a couple of coats of Tile Doctor Colour Grow which is a breathable colour enhancing sealer. This is a super durable product which will give great protection to the floor, especially when it is in a high traffic area such as a hallway.
Victorian Tiled Hallway After Renovation Fulham Victorian Tiled Hallway After Renovation Fulham

My client was amazed with the transformation and said he never expected it to come out as good as it did. I must admit considering the state it was into to start with I can understand his expectations mustn’t have been that high.

Victorian Tiled Hallway After Renovation Fulham

For aftercare I recommended the use of Tile Doctor Neutral Tile Cleaner to maintain the floor, this is a pH neutral product which will ensure the longevity of the newly applied sealer and is mild enough to use every day. Its supplied as a concentrate so you only need a small amount of cleaning fluid to clean the floor and so a one litre bottle will last a while.


Professional Restoration of a Victorian Tiled Hallway in South London

Restoration of an Unloved Victorian Tiled Hallway Floor in Fulham Read More »

Victorian Floor Restoration Putney Before and After Paint Removal

Victorian Tiled Floor Covered by Paint Restored to New in Putney

For whatever reason, property owners do sometimes decide to cover up their tiled floors, whether by using something like linoleum or, in some cases, simply painting over the area. Personally I blame that BBC TV series Changing Rooms for some of these disasters and I wouldn’t be surprised if they were to blame for what had occurred at this flat in Putney which believe it or not is an ancient parish that was historically part of Surrey as opposed to London.

The property owners had re-converted the building from two converted flats back into a single dwelling. However, the previous tenants of the bottom flat had decided to paint over the Victorian tiled floor in their section.

Victorian Floor Restoration Putney Before Paint Removal
Naturally the new owners wanted to have this paint covering removed, and for the Victorian tiles to be restored back to looking their best after a long time of being hidden. Here’s how I did it.

Removing Paint from a Victorian Tiled Floor

To remove the layer of paint from the surface of the tiles, I needed to use a solvent remover product specifically designed to remove paints, this was applied liberally to the affected area and left to dwell.

While the solvent remover was working its magic, I set about cleaning the remainder of the tiled area using Tile Doctor Remove & Go. Remove & Go also contains properties designed to break down solvents, as well as adhesives, along with any old sealer remaining on the tiles. This also helped to lift away any trapped dirt.

I then scraped off the top layer coat of paint and was left with a grey undercoat. To lift this out of the tiles and grout I used Remove & Go in combination with a steamer. The heat of the steamer helped to strip away the excess paint, making removal a much easier process.

Victorian Floor Restoration Putney During Paint Removal

Sealing a Victorian Tiled Floor

After leaving the area to dry for a full five days, I returned to the property to reseal the tiles.

My choice of sealer was Tile Doctor Seal & Go, which is a water-based blend of acrylic polymers designed to provide both a stain resistant surface seal and a long-lasting low-sheen finish. It is suitable for use on most kinds of unsealed, porous surfaces, including Slate, Quarry and Sandstone but works really well on Victorian tiled floors.

Victorian Floor Putney After Restoration Victorian Floor Putney After Restoration

The photo below shows the before and after results of the work, with no traces of the paint covering remaining on the tiles. It is a wonder why someone would choose to cover up such a fantastic Victorian patterned floor, but needless to say my client was very happy with what is for all intents and purposes a brand new feature for their property.

Victorian Floor Restoration Putney Before and After Paint Removal
 

Professional Tile Restoration of a Victorian Tiled Floor in Surrey

Victorian Tiled Floor Covered by Paint Restored to New in Putney Read More »

Limestone Floor Fulham Before and After

Limestone Tiled Floor Cleaned and Polished in Fulham

This Limestone tiled floor was installed at a property in Fulham, I was asked round to quote for cleaning the floor and whilst I was there I did a patch test. The test worked very well and the owner couldn’t believe that the grout was actually white not dark grey.

Limestone Floor Fulham Grout Cleaning 1

Cleaning Polished Limestone Floor Tiles

The first step was to give the floor a quick sweep to remove any surface grit etc. Before starting the burnishing process which we use on hard stone surfaces such as polished Limestone to clean and bring up the shine on the floor. The burnishing pads and encrusted with diamonds and come in a pack of four consisting of Coarse, Medium, Fine and Very Fine 17” pads. I started with a coarse pad which removes sealers and dirt from the floor, a little water is added to lubricate the process.

Limestone Floor Fulham Before Cleaning Zoom 2 Limestone Floor Fulham Before Cleaning 3

Once we had finished with the coarse pad the grout was cleaned up using Tile Doctor Pro-Clean diluted 1 part cleaner to 4 parts water. The solution was then scrubbed into the grout with a stiff hand brush until it was clean. The floor was then rinsed with clean water to remove any cleaning products and we then continued with the remaining burnishing pads applied in order with Medium, Fine and Very Fine until the floor was thoroughly cleaned and polished. We left for the day at this point to allow the tiles to dry overnight.

Limestone Floor Fulham Before Sealing 4

Sealing Limestone Floor Tiles

The following day we returned to seal the floor using two coats of Tile Doctor Colour Grow which is a great sealer for natural stone such as Limestone as it works to lift the colours out of the stone. The last step was to buff the floor to a nice shine with a rotary machine fitted with a white polishing pad.

Limestone Floor Fulham After Cleaning Sealing 5 Limestone Floor Fulham After Cleaning Sealing 6

The customer was really pleased with the result and couldn’t believe that the floor could look so good.

Limestone Floor Fulham Before and After
 

Limestone Floor, Cleaned, Scrubbed, Polished and Sealed in Fulham

Limestone Tiled Floor Cleaned and Polished in Fulham Read More »

Old Encaustic Floor Fulham Before and after Restoration

Old Encaustic Tiled Floor Restored in Fulham

I had an inquiry from a client in Fulham, who was representing the residents of an old building. The building had recently undergone redecoration and in the hallway, they had removed a thirty year old carpet to discover an original encaustic tiled floor underneath which turned out to be 102 years old.

Old Encaustic Floor Fulham Before Cleaning 1 Old Encaustic Floor Fulham Before Cleaning 2

As you can see from the photographs the floor was extremely dirty and covered in lots of glue and paint from the carpet and decorations. Naturally they were keen to have it restored and brought back to life. Given the condition of the tile and the age I to set their expectations and told them that although I was confident of making a big difference to the floor I couldn’t give any guarantees. I gave them my quotation and although it was slighter higher than what they had I mind, it was still less than other quotations that they had received and were also considering the option of replacing the carpet.

After a couple of days I received a call asking me to go ahead with the work and I booked it in.

Encaustic Tiled Floor Cleaning

My approach to the job was to initially spray a mixture of Tile Doctor Remove and Go combined with Tile Doctor NanoTech UltraClean which creates a powerful tile safe coatings remover with tiny abrasive particles that aid the cleaning process.

I left this to dwell on the tile for about fifteen minutes before scrubbing it in using a black scrubbing pad on my rotary machine. This approach removed some glue and a lot of old grime so I then sprayed down more Remove and Go and also used a steamer to loosen the remaining glue and paint. This process was repeated a section at a time until at the end of the day I gave the whole are a thorough rinse before packing away my equipment and leaving it to dry.

Encaustic Tiled Floor Sealing

I returned three days later and carried out a test with my moisture meter to make sure that the floor was dry enough to seal. The meter confirmed it was dry so I then sealed the floor using two coats of Tile Doctor Colour Grow which is an impregnating sealer that really brings out the colour in the tiles.

Old Encaustic Floor Fulham After Cleaning 3 Old Encaustic Floor Fulham After Cleaning 4

And as you can see the floor is transformed and now I have some happy residents who are really pleased that they opted to have the old floor cleaned instead of replacing the carpet. Not to mention that restoring such an original feature has probably added value to their investment as well.

Old Encaustic Floor Fulham Before and after Restoration 5

Original Encaustic Tiled floor cleaned and restored in Fulham

Old Encaustic Tiled Floor Restored in Fulham Read More »

Limestone Tiled Floor Before and After

Limestone Tiled Kitchen Floor Cleaned and Polished in Fulham

Beautiful Limestone tiled floor installed in the kitchen of a house in Fulham, the owner was keen to have the floor cleaned and re-polished; Limestone is a very hardwearing material but does need an occasional professional polish to keep it looking its best.

Limestone Tiled Floor Before Limestone Tiled Floor Before

Cleaning Limestone Floor Tiles

The floor was given a quick wash with Tile Doctor Neutral Cleaner in order to remove any surface grit and then cleaned using a set of Burnishing pads fitted to a rotary machine. The burnishing pads come in four different colours and you work your way through them starting off with the red pad with a little just water and then carry on with the white pad and then the yellow pad until the floor is thoroughly cleaned. Next step was to use Tile Doctor Pro-Clean along the grout lines with a stiff brush to get the grout clean as well. To bring up the polish on the Limestone tiles I used a green polishing pad which is the last in the set of the four burnishing pads.

Limestone Tiled Floor During Limestone Tiled Floor During

Sealing Limestone Floor Tiles

Once the floor was dry we set about sealing it using two coats of Tile Doctor Colour Grow which is a colour enhancing sealer designed to provide maximum stain protection on natural stone floors whilst bringing out the deep colour in the stone. The last step was to buff the floor to a nice shine with a rotary machine fitted with a white pad.

Limestone Tiled Floor After Limestone Tiled Floor After

This job took me two days, and the owner was extremely happy with the results and said it looked better than when it had first been laid eight years ago.

Limestone Tiled Floor Before and After
 

Limestone Floor Cleaned, Polished and Sealed in Fulham

Limestone Tiled Kitchen Floor Cleaned and Polished in Fulham Read More »

Travertine Floor Mid Clean

Travertine Tiled floor in Gerrards Cross

I had a phone call a few weeks ago from a lady in Gerrards Cross to come and clean her large Travertine tiled floors prior to her renting out a property. I had actually carried out this job for her four years ago and she was really pleased with the service we provided and had therefore asked me come back. Thinking back four years is a long time between floor polishes so we certainly did a good job on the floor the first time.

Travertine Floor Before Travertine Floor Before

Maintaining Travertine Tiles

Travertine is a very hard stone which required the surface to be cut back before polishing, to do this we make use of a diamond encrusted burnishing pad system which is supplied in a set of four pads each one having a different purpose. We started with a Red pad first together with a little water and this strips dirt and old sealers from the floor, this is followed with the White, Yellow and finally Green pad which doesn’t required the use of any water. As you progress through the pads you find the polish is restored and you get a deep shine in the surface of the tile.

Travertine Floor Mid-Clean Travertine Floor Mid-Clean

Sealing Travertine Tile

To protect the floor from stains it was sealed with a single coat of Tile Doctor Colour Grow which is a colour enhancing sealer that brings out the colours in natural stone. Once the sealer was dry it was buffed using a white buffing pad to make sure that I hadn’t left any residues from the seal.

Once again the lady was really pleased with our work and promised to call the next time the property was to be let out again, but next time she wants me to do the carpets and the patio areas as well.

Travertine Floor After Travertine Floor After


Travertine tiled floor maintained in Gerrards Cross

Travertine Tiled floor in Gerrards Cross Read More »

Dirty Travertine Sealed

Kitchen Travertine Tiled floor cleaning in Mortlake

We recently cleaned and sealed a small Travertine floor in a kitchen for a customer in Mortlake near Richmond upon Thames in Surrey. To be fair the floor wasn’t that bad, it was just a bit dirty because the customer had been told to use a steamer to clean the floor which was bad advice as the heat from the steam was breaking down the sealer and resulting in the tiles getting dirty.

Dirty Travertine Before Dirty Travertine Before

Cleaning Travertine Kitchen Tile

I first applied a 50/50 mix of Tile Doctor Pro-Clean and Nanotech Ultra Clean leaving it to dwell on the tile for 15 minutes before scrubbing it in with a rotary Machine fitted with a brush head. Once I was satisfied the floor was clean it was thoroughly rinsed with clean water. The dirty solution removed using a wet vacuum and then left it to dry overnight.

Dirty Travertine Cleaned not Sealed Dirty Travertine Cleaned not Sealed

Sealing Travertine Tile

The next day the floor had dried and we proceeded to seal it using two coats of Tile Doctor Colour Grow which as well as providing a good level of stain protection also brings out the natural colours in the stone. I always use a water test to determine if the right about of sealer has been applied, very simply you drop a small amount of water onto the stone and if it forms a bubble on the surface it’s sealed.

Dirty Travertine Sealed Dirty Travertine Sealed

Before I left I provided the customer with a proper maintenance plan for the floor, and expect a call in around a years’ time to come and do a deep clean and seal. The customer was delighted with the results and said the floor looked better than when they had it laid.

Resolving Travertine steam cleaning problems in Surrey

Kitchen Travertine Tiled floor cleaning in Mortlake Read More »

Victorian Floor After Cleaning

Victorian Tiled Hallway Cleaning in Richmond

This hallway floor was at a property in the London borough of Richmond which had just been sold and the new owner wanted the Victorian tiled floor cleaning before she moved in.

Victorian Floor Cleaning Before

Cleaning a Victorian Floor

To clean the floor I applied a 50/50 mix of Tile Doctor Pro-Clean and NanoTech Ultra Clean diluted with water. Pro-Clean is a strong alkaline cleaner so it won’t damage the tile like some acidic cleaners and NanoTech Ultra Clean adds tiny abrasive particles to the solution that can help penetrate into the tile to lift out the dirt. This was left to dwell and soak into the floor for a while before being agitated using a rotary machine fitted with a black scrubbing pad. This worked to clean the floor and strip any remaining sealer from the tile; the soiled solution was removed from the floor using a wet vacuum and then thoroughly rinsed to remove any cleaning products before sealing and neutralise the floor.

Victorian Floor Cleaning During

Sealing a Victorian Floor Sealing

The floor was dried using an floor blower, which is a like an industrial hair dryer, before being sealed with five coats of Tile Doctor Seal and Go which is an ideal sealer for Victorian tiled floors as it leaves a low sheen finish whilst providing excellent stain protection. You have to wait for each coat to dry before moving on to the next so it was a long day, fortunately the house was empty which made the job easier.

Victorian Floor After Cleaning
 

Victorian Tiled hallway floor cleaned and sealed in Richmond

Victorian Tiled Hallway Cleaning in Richmond Read More »

Limestone Floor After

Limestone Tiled Floor Cleaning in Fulham

This Limestone tiled floor hadn’t been cleaned properly for 5 years and we were asked to clean and reseal, hopefully you can appreciate the improvement in the photographs.

Limestone Floor Before Limestone Floor Before

Cleaning Limestone Floor Tiles

The first step was to scrub the Limestone tiles with a rotary machine fitted with a black scrubbing pad and a solution of Tile Doctor Pro-Clean which is a strong multi-purpose alkaline cleaning product designed for use on stone. A strong dilution of Pro-Clean can remove sealer however it was apparent some sealer was still present on parts of the floor so Tile Doctor Remove and Go which is a dedicated coatings remover was applied to remove the remaining seal.

The floor was then rinsed thoroughly with clean water to remove any cleaning products and we then used the Twister Burnishing Pad system with a rotary machine to complete the cleaning process and polish the floor. The pads come in four different colours and you work your way through them one by one until the floor is thoroughly cleaned and polished.

Sealing Limestone Floor Tiles

Once the floor was dry we set about sealing it using two coats of Tile Doctor Ultra Seal which is a no-sheen natural look penetrating sealer designed to provide maximum stain protection on natural stone floors including Limestone, Granite and Marble. The last step was to buff the floor to a nice shine with a rotary machine fitted with a white pad.

Limestone Floor After Limestone Floor After

The customer was extremely happy with the result and has since recommended us to others.

Limestone Floor, Cleaned, Scrubbed, Polished and Sealed in Fulham

Limestone Tiled Floor Cleaning in Fulham Read More »

Fulham Victorian Floor After

Victorian Tiled Floor Restoration in Fulham

Details below of a Victorian tiled floor that we cleaned and sealed for a gentleman in Fulham South West London after he had refurbished his house and the workmen had left it worse for wear.

Victorian Floor Cleaning

I used a strong solution of Tile Doctor Pro-Clean diluted with hot water and applied to the floor and agitated using a rotary machine fitted with a black scrubbing pad. This worked to clean the floor and strip the existing sealer from the whole area, I then got on my hands and knees to scrub the edges and to check that all paint and glue had been removed. The soiled solution was removed using a wet vacuum and then rinsed three times before using an industrial steamer over the whole floor. This helps to neutralise and remove any products which could upset a sealer.

Fulham Victorian Floor Before Fulham Victorian Floor Before

Victorian Floor Sealing

I then left the floor to dry out and came back two days later to seal it. On my return I checked that all the chemicals had been removed and that there was no paint and muck left on the floor.

Once I was happy I then laid 6 coats of Tile Doctor Seal and Go which is an ideal sealer for Victorian tiled floors as it provides stain resistance with a low sheen finish. An industrial air mover was used to reduce drying times between coats. The last step was to buff the floor using a white buffing pad to harden the seal. The gentleman was really happy with the result and was pleased that the new tiles that had been laid as part of the renovation now blended in perfectly with the old tiles.

Fulham Victorian Floor After Fulham Victorian Floor After


Victorian Tiled floor cleaned and sealed in Fulham

Victorian Tiled Floor Restoration in Fulham Read More »

Victorian Floor Cleaned part Sealed in Richmond

Victorian Tiled Hallway Restoration in Richmond

Set of photographs here from a Victorian Tiled floor in a block of flats in Richmond Upon Thames. The floor was in the communal hallway and as a result had seen a lot of traffic and was looking very dull and in need of a good clean and re-seal.

Victorian Floor before cleaining in Richmond

Cleaning the Victorian Tiled Floor

The floor was cleaned using a dilution of Tile Doctor Pro-Clean which had been left to dwell for 20 minutes before being agitated using a rotary machine fitted with a black scrubbing pad. We use a wet vacuum to remove the dirty cleaning solution before thoroughly rinsing the floor down with clean water to remove any remaining cleaning product that might have an adverse effect on the sealer. The floor was left to dry assisted by the use of a warm air blower.

Victorian Floor Cleaned and partly Sealed in Richmond

Sealing the Victorian Tiled Floor

Having the right equipment can make light work of cleaning a large area and the blower meant we were soon looking at sealing the floor. The trouble with working in a communal area however is we had residents coming and going so we had to seal the floor in two halves. We used Tile Doctor Pro-Seal to seal the floor; it’s more expensive than some but gives a natural look whilst penetrating deeper into the tile to provide maximum stain protection, something you need in high traffic areas.

When the rest of the floor was completed and left to dry for an hour I used a rotary machine fitted with a white buffing pad to harden the floor up.

The managing agent was really pleased because she received a lot of calls from the residents to thank her as this floor hadn’t been cleaned and sealed for a lot of years.

Victorian Floor Cleaned Sealed in Richmond
 

Victorian Floor Cleaned and Sealed in Richmond Upon Thames

Victorian Tiled Hallway Restoration in Richmond Read More »

=================================

South London Tile Doctor

================================= Read More »

Scroll to Top