tile sealing

Victorian Tiled Hallway Before After Restoration Tooting

Old Victorian Tiled Hallway Renovated in Tooting

We were asked by the customer in Tooting, if we could restore this Victorian tiled hallway floor that they had found underneath a carpet while they were refurbishing their property. Interestingly he had already had a quote from another company, but they were unable to identify what type of tile it was. Old floors like these are not for the in-experienced and if you look closely at my website you will see I have published over 60 detailed accounts of tile cleaning and restorations since 2012.

Victorian Tiled Hallway Before Restoration Tooting Victorian Tiled Hallway Before Restoration Tooting

I could see there was a lovely Victorian Tiled floor hiding underneath the paint spots and plaster dust and carried out a test patch to show him what the floor would look like when it was clean. I also showed him pictures of similar floors that we have restored over the years and was able to show the finishes you can achieve from different sealers. Convinced I was the chap for the job he booked me in there and then.

Cleaning a Heavily Soiled Victorian Tiled Floor

Returning on the agreed date we started the cleaning process by pre-wetting the floor with water. This was followed by the application of a strong dilution of Tile Doctor Remove and Go which was left to soak in for approximately ten minutes. This product is designed for the safe removal of old coating such as sealers from Tile, Stone and Grout and I knew it would be ideal for the task. The solution was then scrubbed into the Victorian tile and gout using a rotary machine fitted with a black stripping pad. The scrubbing process released a lot of the stains and dirt from the floor which were then extracted with a wet vacuum. The process was then repeated until all the sections were treated.

The floor was then rinsed with water and the resultant residue extracted using a wet vacuum before treating the tiles to an Acid Wash to neutralise any alkaline salts and remove mineral deposits and old grout smears. This was done by applying Tile Doctor Acid Gel for around fifteen minutes and then removing it with a final rinse.

Cleaning the hallway took up most of the day and I needed the tiles to be dry before the next step of applying a sealer, so after discussing progress with the owner I left for the day and gave the floor three days to dry out.

Sealing a Victorian Tiled Hallway

On our return I first checked the floor with a damp meter to make sure it had dried out thoroughly. All was well, so we proceeded to seal the tiles using Tile Doctor Colour Grow which is an impregnating sealer that leaves a matt finish and soaks into the pores of the tile protecting it from within and enhancing its appearance in the process.

Victorian Tiled Hallway After Restoration Tooting Victorian Tiled Hallway After Restoration Tooting

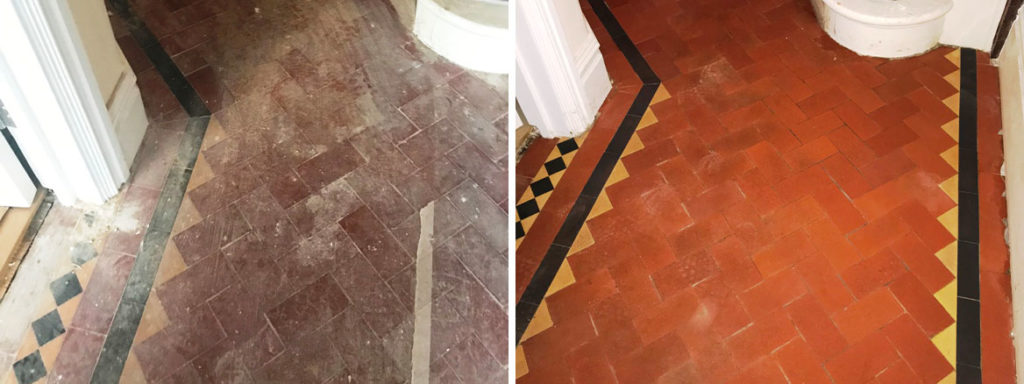
Four coats of sealer were needed and as you can see by the final pictures the hallway now looks fantastic and needless to say the customer was over the moon with the final results.

Victorian Tiled Hallway After Restoration Tooting
 

Professional Victorian Tiled Hallway Cleaning in South London

Old Victorian Tiled Hallway Renovated in Tooting Read More »

Victorian Tiled Hallway Before and After Restoration Fulham

Heavily Soiled Victorian Tiled Hallway Restored in Fulham

This Victorian tiled floor at a house in Fulham was in an absolutely horrendous state. As you can see from the first photograph, the tiles were caked in layer upon layer of muck, including paint and glue stains. This was due to the floor being unknowingly hidden for many, many years under carpet.

Victorian Tiled Hallway Before Restoration Fulham
Needless to say, the property owner was desperate to remedy get the fantastic pattern floor back into good nick, and so contacted me for assistance. I travelled up to the property in the town of Fulham in South West London, which is famous for its football club, to survey the situation and begin the work. It was immediately clear that the thick layers of dirt and staining would need to be removed, before being treated to a new seal to provide long-lasting protection.

Victorian Tiled Hallway Before Restoration Fulham

Cleaning a Heavily Soiled Victorian Tiled a Floor

My product of choice for removing the extremely heavy soil buildup on the tiles was Tile Doctor NanoTech HBU (formerly UltraClean), a powerful solvent-based cream cleaner. What makes this product different from standard cleaners is its use of nano-sized cleaning particles to penetrate below tough stains, dissolve them, and lift them to the surface. NanoTech HBU is a highly versatile product which can be used on most types of natural stone floor, both polished and unpolished.

I laid down the NanoTech HBU and left it to dwell for a short period on the tiles, allowing it to begin eating through the dirt, before using a scraper in combination with a steamer to manually lift the muck away from the tiles. Next, to tackle the glue and paint marks, I applied Tile Doctor Remove and Go, a stripper specifically designed to break down adhesive and solvent stains, and then used a scraper and a scouring pad to manually remove the glue and paint in the affected areas.

Once this was done, I scrubbed in some more NanoTech HBU to dissolve any remaining muck before rinsing the area thoroughly with clean water. To complete the cleaning process, I laid some down some Tile Doctor Acid Gel, which is a blend of Phosphoric and Hydrochloric acids in gel form, to eliminate inherent grout haze and alkaline mineral deposits in the affected areas. I then left this to dwell for ten minutes before giving the floor a final rinse to remove any chemicals and soiled residue. The floor was left for a week to dry out before I returned to seal it.

Sealing a Victorian Tiled Floor

With these fantastic Victorian tiles now muck-free, I proceeded to seal the floor. I initially applied a single coat of Tile Doctor Colour Grow, which is an impregnating, colour-enhancing sealer that really brings out the colourful features of patterned Victorian tiled floors like this one.

Victorian Tiled Hallway After Restoration Fulham
Once this initial coat of sealant had dried in, I asked the customer which kind of finish she preferred for the floor. She decided on a sheen finish, and so I laid down an extra five layers of Colour Grow to ensure the desired appearance, as well as to guarantee durable surface protection against dirt, stains and spillages.

Victorian Tiled Hallway After Restoration Fulham
The customer was really pleased with the results of the restoration, and left the following feedback:

“Bill worked extremely hard to clean and seal our hall tiles. Everyone is amazed at how good they look. We are extremely pleased with the results.”

Victorian Tiled Hallway Before and After Restoration Fulham
Another great Victorian tiled floor brought back to life, and and satisfied customer!

Professional Victorian Tiled Hallway Restoration in South London

Heavily Soiled Victorian Tiled Hallway Restored in Fulham Read More »

Limestone Floor Before and After Burnishing Wandsworth

Limestone Kitchen Floor and Shower Tiles Refinished in Wandsworth

Sometimes, Tile Doctor customers will have more than one tiled area in need of professional maintenance. At this house in Wandsworth, South London; I was commissioned to clean and seal firstly a Limestone tiled kitchen floor, and a Limestone tiled shower unit.

Limestone Floor Before Cleaning Wandsworth

Cleaning and Sealing a Limestone Kitchen Floor

I started with the Limestone tiled kitchen floor which, like many other stone floors had not been treated to the correct regular care and had become dull and dirty over time as a result.

My first task involved applying Tile Doctor Remove & Go stripper in order to break down any old surface sealant and dirt. Then, I began the burnishing process, which essentially involves polishing with pads of varying grit. I started with a Medium 800 grit burnishing pad to provide an initial polish and grind away ingrained dirt, before refining this with a Fine 1500 grit pad to achieve a smooth surface. The burnishing pads are used in combination with a small amount of water.

Limestone Floor During Cleaning Wandsworth
After leaving the floor to dry for 24 hours, I sealed the tiles with Tile Doctor Colour Grow. This will provide durable surface protection for the future and also further accentuate the great natural shades in the Limestone. To add the finishing touches, I buffed the floor with a soft white buffing pad.

Limestone Floor After Burnishing Wandsworth

Cleaning and Sealing a Limestone Tiled Shower Unit

During the time it took for the Limestone tiled kitchen floor to dry, I set my sights on tackling the shower unit. The unit was suffering from a terrible amount of limescale, which would need to be removed using a set of hand held burnishing pads. Limescale deposits build up on surfaces which come into contact with hard water, and can become very unsightly if not dealt with promptly.

Limestone Shower Tiles Before Cleaning Wandsworth
This proved to be a more awkward job thanks to the intricate Limestone fittings on the shower walls. I used the smaller 6-inch burnishing pads fitted to a hand buffer, while for the kitchen floor I naturally used the larger sized pads attached to a heavy weight buffing machine.

With the limescale as bad as it was, I started to grind it off with a Very Coarse 120 grit burnishing pad, before working my way up gradually through the system of pads – each time using a slightly finer grit pad until I finished with the Ultra Fine 3000 grit pad and the surface finish had been restored.

Limestone Shower Tiles After Cleaning Wandsworth
Following this, I removed the silicone sealant around the shower fittings, and dealt with the mould growing behind it.

On the second day of work, I sealed both the kitchen floor and the shower unit. Much like the kitchen floor, the shower unit was sealed using Colour Grow to ensure long lasting protection, and fresh silicon was also fitted.

Two days of work and two rejuvenated Limestone features later, I was left with a very happy customer.

Limestone Shower Tiles Before and After Cleaning Wandsworth
 

Restoring the appearance of a Limestone Kitchen Floor and Shower in South London

Limestone Kitchen Floor and Shower Tiles Refinished in Wandsworth Read More »

Victorian Floor Restoration Putney Before and After Paint Removal

Victorian Tiled Floor Covered by Paint Restored to New in Putney

For whatever reason, property owners do sometimes decide to cover up their tiled floors, whether by using something like linoleum or, in some cases, simply painting over the area. Personally I blame that BBC TV series Changing Rooms for some of these disasters and I wouldn’t be surprised if they were to blame for what had occurred at this flat in Putney which believe it or not is an ancient parish that was historically part of Surrey as opposed to London.

The property owners had re-converted the building from two converted flats back into a single dwelling. However, the previous tenants of the bottom flat had decided to paint over the Victorian tiled floor in their section.

Victorian Floor Restoration Putney Before Paint Removal
Naturally the new owners wanted to have this paint covering removed, and for the Victorian tiles to be restored back to looking their best after a long time of being hidden. Here’s how I did it.

Removing Paint from a Victorian Tiled Floor

To remove the layer of paint from the surface of the tiles, I needed to use a solvent remover product specifically designed to remove paints, this was applied liberally to the affected area and left to dwell.

While the solvent remover was working its magic, I set about cleaning the remainder of the tiled area using Tile Doctor Remove & Go. Remove & Go also contains properties designed to break down solvents, as well as adhesives, along with any old sealer remaining on the tiles. This also helped to lift away any trapped dirt.

I then scraped off the top layer coat of paint and was left with a grey undercoat. To lift this out of the tiles and grout I used Remove & Go in combination with a steamer. The heat of the steamer helped to strip away the excess paint, making removal a much easier process.

Victorian Floor Restoration Putney During Paint Removal

Sealing a Victorian Tiled Floor

After leaving the area to dry for a full five days, I returned to the property to reseal the tiles.

My choice of sealer was Tile Doctor Seal & Go, which is a water-based blend of acrylic polymers designed to provide both a stain resistant surface seal and a long-lasting low-sheen finish. It is suitable for use on most kinds of unsealed, porous surfaces, including Slate, Quarry and Sandstone but works really well on Victorian tiled floors.

Victorian Floor Putney After Restoration Victorian Floor Putney After Restoration

The photo below shows the before and after results of the work, with no traces of the paint covering remaining on the tiles. It is a wonder why someone would choose to cover up such a fantastic Victorian patterned floor, but needless to say my client was very happy with what is for all intents and purposes a brand new feature for their property.

Victorian Floor Restoration Putney Before and After Paint Removal
 

Professional Tile Restoration of a Victorian Tiled Floor in Surrey

Victorian Tiled Floor Covered by Paint Restored to New in Putney Read More »

Terrazzo Flooring Redhill Church Before After Restoration

Terrazzo Tiled Flooring Restored at a Church in Redhill

Every so often I will get the chance to undertake tiled flooring restoration work in public buildings, and late last year I was asked to clean and seal a Terrazzo floor at a church in Redhill. The floor wasn’t in great condition; not only was it suffering from a significant amount of dirt due to a lack of proper maintenance, but it was also marked by several cracks. Overall, the appearance of the floor was very displeasing and the church was keen to have me in to complete some repairs, along with a deep clean and seal.

Terrazzo Flooring Redhill Church Before Restoration Terrazzo Flooring Redhill Church During Crack Repair

Cleaning and Burnishing a Terrazzo tiled floor

Upon initial inspection of the floor, I was unable to say for certain whether there was any old sealer remaining on the tiles so to ensure it was removed I began the cleaning process by applying a layer of Tile Doctor Remove & Go, which is a powerful cleaner/stripper designed to both break down old layers of sealant and lift out any ingrained dirt.

I then gave the floor a rinse with water to remove any excess cleaning product, before moving onto a different cleaning process, known as burnishing. Burnishing involves polishing the surface with to achieve an aesthetically pleasing sheen finish. The Tile Doctor burnishing system consists of four diamond encrusted burnishing pads with different levels of grit.

Terrazzo Flooring Redhill Church Part Cleaned Terrazzo Flooring Redhill Church Part Cleaned

I began by applying a Coarse burnishing pad, before working my way through the system with Medium, Fine and finally Very Fine pads to achieve a very refined, high quality polished finish, you need to use a little water to help lubricate the burnishing and you need to rinse the floor after each pad to remove the slurry.

Terrazzo Flooring Redhill Church Cleaning in Progress Terrazzo Flooring Redhill Church During Burnishing

Once the floor had been allowed to dry completely following both cleaning processes, I set about filling the cracks in the tiles with two part resin stone filler.

Terrazzo Flooring Redhill Church During Crack Repair Terrazzo Flooring Redhill Church Crack Filled

Then, once the filler had dried, I re-polished the floor using only the extra fine burnishing pad, focusing my attention along the crack lines. This really helped to reduce the evidence of cracks and left instead a smoothed surface.

Sealing a Terrazzo tiled floor

The final stage of the restoration involved sealing the Terrazzo tiles with Colour Grow, which is Tile Doctor’s colour intensifying sealer that impregnates the stone seeping into its pores to provide protecting the floor from within with a robust seal capable of withstanding the high amount of traffic experienced by church floors. The last step was to buff the entire area with a soft white buffing pad.

Terrazzo Flooring Redhill Church After Terrazzo Flooring Redhill Church After

The church was very pleased with the results, especially that they were able to show it off for last year’s Remembrance Sunday and left the following comment on the Tile Doctor feedback system:

“Many thanks for the work on our Terrazzo floors. It’s only when you see the before and after that you realise how grubby they had become. We have had loads of complimentary comments as to how good they look. Bill Bailey was a very personable and professional contractor who put himself out to work around our requirements and others working in the buildings at the same time. More than happy to recommend the company and Bill personally. Many thanks for a job well done.”

Terrazzo Flooring Redhill Church Before and After Restoration
 

Professional Restoration of a Cracked Terrazzo Church Floor in Surrey

Terrazzo Tiled Flooring Restored at a Church in Redhill Read More »

Black Limestone Before and After in Wimbledon

Black Limestone Floor installation problems resolved in Wimbledon

I was recently asked to this property in Wimbledon in to see if there was anything we could do to resolve the problem with a recently laid Black Limestone tiled floor. The builders that had laid the Limestone did not cover or clean the tiles prior to sealing with an impregnating seal thereby trapping in all the dirt from the building works. They then grouted the tiles but didn’t clean the grout off the surface before putting on another two coats of sealer all of which resulted in a very poor finish.

Black Limestone Tile Showing Trapped Dirt in Wimbledon
Naturally the customer was not happy so called them back to rectify the problem and so they came back and tried to strip the sealer off with cloths and a chemical stripper. Then without rinsing the stone to remove the chemicals they added another two coats of sealer; in desperation the lady gave up with them and called me in.

Black Limestone Tile Showing Trapped Dirt in Wimbledon

Stripping the Limestone Tiled Floor

To resolve I tried all the sealant strippers available to me but couldn’t budge the mess effectively. The only other option available was to diamond grind the surface so I discussed this with the customer and she agreed to this and left me to carry on.

Initially I started with a coarse 400 grit diamond pad but even that wasn’t having much effect so in the end I had to cut back the surface using a 100 grit pad moving up to 200 grit, then 400 before finally stopping at 800. To lubricate the process you need to use a little water and then rinse away the resultant soil after each pad. If this was a polished stone surface I would have continued with finer and finer grits to restore the surface polish however these tiles were rough limestone and I needed to leave it as near to how it should be.

Black Limestone Tile Grinded with Diamond Pads in Wimbledon
Once all the Limestone had been stripped back the stone turned an uninviting grey colour, so to bring it back to black I applied two coats of Tile Doctor Stone Oil which enhanced the colour.

Black Limestone Tile Adding Stone Oil in Wimbledon

Sealing Black Limestone Tiles

I left the floor overnight to allow the Stone Oil to dry out and then returned to seal the Limestone using two coats of Tile Doctor Colour Grow which is an impregnating sealer that enhances the colour in the stone and will protect it from staining going forward.

Black Limestone Grinded and sealed in Wimbledon
When the customer saw the final result she was overwhelmed and said she felt like crying with relief, because the floor now looked how she had imagined it to be. It was a great feeling for me to know that I had solved the problems for her.

Black Limestone Before and After in Wimbledon
 

Restoring Black Limestone Tiled Floor in Wimbledon

Black Limestone Floor installation problems resolved in Wimbledon Read More »

Polished Limestone After Cleaning in Leatherhead

Limestone Tiled Floor Cleaning in Leatherhead

I was asked by a customer in Leatherhead, Surrey to clean the Limestone tiled floors that had been installed throughout the ground floor of his house. I popped round to take a look at the job and could see that the Limestone tile and grout was quite dirty; it was clear that the sealer had broken down and dirt was now becoming ingrained into the stone and grout.
The floor would need to be burnished and re-sealed to get it back to its original condition and so I provided a quote to do the work. The quote was accepted although he did ask if I could provide a couple of references from former clients; there are over 70 testimonials from past customers on my website so this was not a problem and I was happy to do so. Once he had received the references he called to book me in.

Polished Limestone Before Cleaning in Leatherhead Polished Limestone Before Cleaning in Leatherhead

Cleaning Limestone Floor Tiles

My first job was to protect the walls and units before scrubbing the first area with a hot solution of Tile Doctor Pro-Clean using a rotary machine fitted with a brush head attachment. This process lifted the dirt out from the grout, the surface and any holes.

The floor was then rinsed thoroughly with clean water to remove any cleaning products and I then proceeded to burnish the Limestone tiles using a set of four burnishing pads system fitted to a rotary machine. You start with a coarse pad lubricated with a little water and this removes any remaining sealers and ingrained dirt from the stone. Any slurry is then rinsed away and you move onto the remaining medium, fine and superfine polishing pads which bring back the polished surface, again each pad needs to be lubricated with a little water which needs to be rinsed away after each pad. It was a large area so as you can imagine this took some time to apply this process to the entire floor so I focused on the Kitchen then first day and came back the second day to work on the hallway and utility room.

Sealing Limestone Floor Tiles

On the third day I came back to seal the floors using two coats of Tile Doctor Colour Grow which is a colour enhancing penetrating sealer that brings out the different shades of colour in Limestone and is designed to provide maximum stain protection on natural stone floors. The last step was to buff the floor to a nice shine with a rotary machine fitted with a white pad.

Polished Limestone After Cleaning in Leatherhead Polished Limestone After Cleaning in Leatherhead

The grout is now back to its original grey as opposed to black and the Limestone look new again, needless to say the customer was really pleased with the finish and has since recommended my services to other friends.

Polished Limestone After Cleaning in Leatherhead
 

Limestone Floor, Cleaned, Scrubbed, Polished and Sealed in Leatherhead

Limestone Tiled Floor Cleaning in Leatherhead Read More »

Scroll to Top